If your car’s headlights and other interior lights dim during high bass situations from the audio amplifier, adding a Car audio capacitor is the perfect solution. This capacitor acts like a temporary energy reservoir for your audio amplifier when high bass hits. The capacitor is connected in parallel and initially discharges a large current for the amplifier. This article shares a step-by-step guide for wiring and safely charging a car audio capacitor without blowing the fuse.
Important Note
Note: In a fully discharged condition, the capacitor acts like it is short-circuited. Wiring a large capacitance value capacitor incorrectly can cause a large spark, blow a fuse, and may damage your electrical circuits.
Before starting to do wiring, you need some tools and materials. The list of tools is given below.
Tools and Materials Needed
- Car audio capacitor (typically 1 Farad per 1,000 watts of RMS power).
- Amplifier wiring kit (matching the gauge of your existing amp power wire).
- Charging resistor or test light (usually included with the capacitor).
- Wire strippers and crimpers.
- Ring terminals and electrical tape.
How to Charge Car Audio Capacitor
Don’t directly connect the larger capacitor directly through the fuse. This creates initially the short because discharged capacitor is cats like short, so we need to slow charge its first.
Time needed: 1 minute
Slow Charge Capacitor using the Resistor comes along with the capacitor.
- Disconnect the main fuse near your car battery
You need to Disconnect the main fuse near your car battery to cut the power to the amplifier power cable.
- Connect Capacitor Ground First
Connect the capacitor’s Ground (-ve) terminal to your vehicle’s bare metal chassis ground.
- Connect the Charging Resistor
Take the charging resistor (or a standard 12V automotive test light) and place it in the line with the power wire. Connect one end of the resistor to the unpowered main power cable and the other end to the capacitor’s Positive terminal. This will initiate charging slowly.
- Re-insert the main fuse near the car battery.
If your capacitor has a digital display for showing voltage, watch the voltage rise to about 12V. If using a test light, the light will shine brightly and then slowly dim until it goes out completely. carefully remove the resistor and ready to connect directly.
Car Audio Capacitor Wiring Diagram
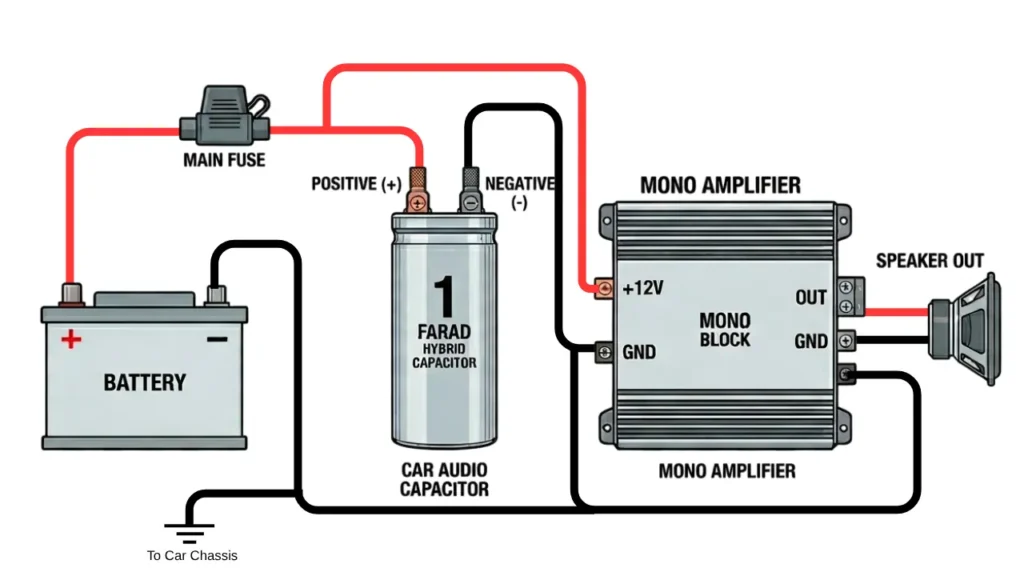
Capacitor Wiring Instruction and Steps
The capacitor always connect parallel to the power supply. As possible connect the capacitor nears to the amplifier around length of 1 to 2 feet.
Step 1: Wire Positive Terminal
After proper charging directly connect the capacitor positive terminal to the supply positive terminal of the 12V battery. Now the amplifier shares the same positive supply from battery and the capacitor.
Step2: Wire the Ground (-ve ) Terminal
Connect the capacitor ground connection to the neat unpainted area of the vehicle chasses. This will ensure less resistance for grounding and lowering heat production because of proper current flow. The another wire connects to the amplifier negative supply.
You can Check free online tool of Capacitor Energy Calculator to Find Energy Stored in a Capacitor
Frequently Asked Questions (FAQ)
Yes, you can connect multiple amplifiers to the same capacitor connection. $ channel amplifier and sub amplifier can connect.
Always use the wire gauged for the amplifier matching. I recombed to use same gauge wire in all connections.
A properly working or good capacitors does not drain your battery. The volt meter on the capacitor may drain slowly if it is works 24 hour in parking condition. Better to turn the display off and turn it ON if needed only.