In this project, we are going to build a 3x3x3LED cube and connect it to the Arduino UNO to get the different patterns of light. For beginners, we will start with a simple pattern. A typical 3x3x3 LED cube that is connected to the Arduino UNO is shown in the images the cube consists of 27 light-emitting diodes, these 27 light-emitting diodes are arranged in a row and column-wise. so many cubes that can be designed, the simplest way of making is a 3x3x3 LED cube.
Advantage of 3 into 3 into 3 LED cube
There are some advantages to designing the 3 into 3 into Arduino LED cube.
- The first one for this cube you don’t need to worry about the power consumption for dissipation.
- For proper working low power supply is needed.
- Here we won’t need to use any switching electronics for this cube.
- With lesser logic terminals we don’t need to shift resistors or anything like that.
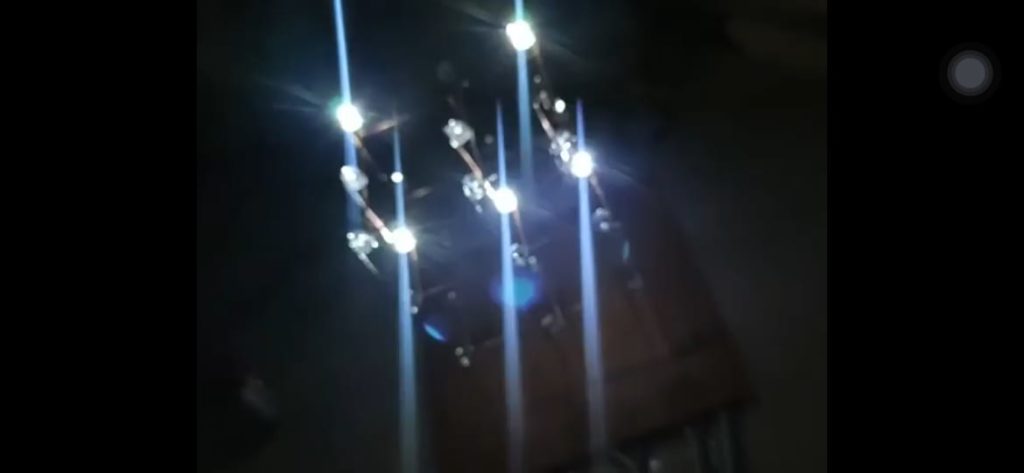
The LED uses about 20 milliamps of current the load consumption is much less than the number provided by the maximum current allowed through the LED. Normally LED works well from 2 milliamps to 5 milliamps anything higher than the current LED will be burned out.
Components required for LED cube
- Arduino UNO or Arduino nano
- The resistor and 27 LEDs.
- Connecting wires.
Building construction of Arduino LED cube
In the first step, you need to check all the 27 LEDs are working properly once the cube is done if there is any faulty LED present in the cube it would be very difficult to replace so be careful to do this step.
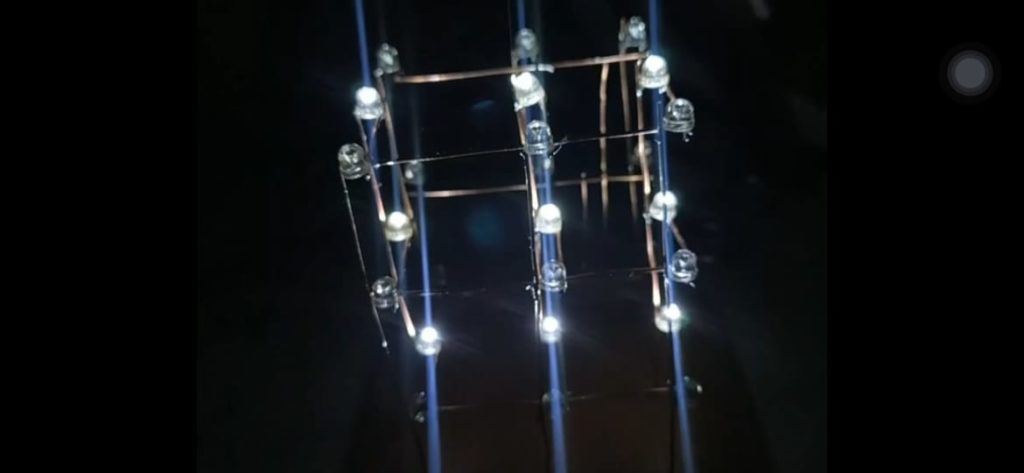
The second step takes a breadboard wire and peels the area of the conductor. we can use any wires but breadboard connecting wires work great. after the peeling of this conducting wire. this wire is used for bridging the LED lights we will get to this point shortly.
Take 27 LEDs place them in a series manner and connect all the negative terminals. In this way connect the two pairs of LEDs and take a common negative.
After soldering all these connections you will get tree common negative inputs and 9 positive inputs to the LED cube. connect LED negative and positive connections through the resistors. and properly attach this connection to the Arduino board.
Upload the given code to the Arduino board. And enjoy the working of the LED cube.
The working video is given below this article if any doubt you can check the working video and the working tutorial thank you.
Circuit diagram

3x3x3 led cube Arduino code
int neg1 = 13; //"neg1" is connected to the 13th digital pin of arduino
int neg2 = 12; //"neg2" is connected to the 12th digital pin of arduino
int neg3 = 11; //"neg3" is connected to the 11th digital pin of arduino
int neg4 = 10; //"neg4" is connected to the 10th digital pin of arduino
int neg5 = 9; //"neg5" is connected to the 9th digital pin of arduino
int neg6 = 8; //"neg6" is connected to the 8th digital pin of arduino
int neg7 = 7; //"neg7" is connected to the 7th digital pin of arduino
int neg8 = 6; //"neg8" is connected to the 6th digital pin of arduino
int neg9 = 5; //"neg9" is connected to the 5th digital pin of arduino
int pos1 = 4; //"pos1" is connected to the 4th digital pin of arduino
int pos2 = 3; //"pos2" is connected to the 3rd digital pin of arduino
int pos3 = 2; //"pos3" is connected to the 2nd digital pin of arduino
int delay_time=100, j=0;
// the setup routine runs once when you press reset:
void setup() {
// initialize the digital pin as an output.
pinMode(neg1, OUTPUT);
pinMode(neg2, OUTPUT);
pinMode(neg3, OUTPUT);
pinMode(neg4, OUTPUT);
pinMode(neg5, OUTPUT);
pinMode(neg6, OUTPUT);
pinMode(neg7, OUTPUT);
pinMode(neg8, OUTPUT);
pinMode(neg9, OUTPUT);
pinMode(pos1, OUTPUT);
pinMode(pos2, OUTPUT);
pinMode(pos3, OUTPUT);
}
// the loop routine runs over and over again forever:
void loop() {
for(j=0;j<6;j++)
{
digitalWrite(pos1, HIGH);
digitalWrite(pos2, HIGH);
digitalWrite(pos3, LOW);
digitalWrite(neg1, LOW);
digitalWrite(neg2, LOW);
digitalWrite(neg3, HIGH);
digitalWrite(neg4, LOW);
digitalWrite(neg5, LOW);
digitalWrite(neg6, HIGH);
digitalWrite(neg7, LOW);
digitalWrite(neg8, LOW);
digitalWrite(neg9, HIGH);
delay(150);
digitalWrite(pos1, HIGH);
digitalWrite(pos2, LOW);
digitalWrite(pos3, HIGH);
digitalWrite(neg1, LOW);
digitalWrite(neg2, HIGH);
digitalWrite(neg3, LOW);
digitalWrite(neg4, LOW);
digitalWrite(neg5, HIGH);
digitalWrite(neg6, LOW);
digitalWrite(neg7, LOW);
digitalWrite(neg8, HIGH);
digitalWrite(neg9, LOW);
delay(150);
digitalWrite(pos1, LOW);
digitalWrite(pos2, HIGH);
digitalWrite(pos3, HIGH);
digitalWrite(neg1, HIGH);
digitalWrite(neg2, LOW);
digitalWrite(neg3, LOW);
digitalWrite(neg4, HIGH);
digitalWrite(neg5, LOW);
digitalWrite(neg6, LOW);
digitalWrite(neg7, HIGH);
digitalWrite(neg8, LOW);
digitalWrite(neg9, LOW);
delay(150);
digitalWrite(pos1, HIGH);
digitalWrite(pos2, LOW);
digitalWrite(pos3, HIGH);
digitalWrite(neg1, HIGH);
digitalWrite(neg2, LOW);
digitalWrite(neg3, LOW);
digitalWrite(neg4, HIGH);
digitalWrite(neg5, LOW);
digitalWrite(neg6, LOW);
digitalWrite(neg7, HIGH);
digitalWrite(neg8, LOW);
digitalWrite(neg9, LOW);
delay(150);
digitalWrite(pos1, HIGH);
digitalWrite(pos2, HIGH);
digitalWrite(pos3, LOW);
digitalWrite(neg1, HIGH);
digitalWrite(neg2, LOW);
digitalWrite(neg3, LOW);
digitalWrite(neg4, HIGH);
digitalWrite(neg5, LOW);
digitalWrite(neg6, LOW);
digitalWrite(neg7, HIGH);
digitalWrite(neg8, LOW);
digitalWrite(neg9, LOW);
delay(150);
digitalWrite(pos1, HIGH);
digitalWrite(pos2, LOW);
digitalWrite(pos3, HIGH);
digitalWrite(neg1, LOW);
digitalWrite(neg2, HIGH);
digitalWrite(neg3, LOW);
digitalWrite(neg4, LOW);
digitalWrite(neg5, HIGH);
digitalWrite(neg6, LOW);
digitalWrite(neg7, LOW);
digitalWrite(neg8, HIGH);
digitalWrite(neg9, LOW);
delay(150);
digitalWrite(pos1, LOW);
digitalWrite(pos2, HIGH);
digitalWrite(pos3, HIGH);
digitalWrite(neg1, LOW);
digitalWrite(neg2, LOW);
digitalWrite(neg3, HIGH);
digitalWrite(neg4, LOW);
digitalWrite(neg5, LOW);
digitalWrite(neg6, HIGH);
digitalWrite(neg7, LOW);
digitalWrite(neg8, LOW);
digitalWrite(neg9, HIGH);
delay(150);
digitalWrite(pos1, HIGH);
digitalWrite(pos2, LOW);
digitalWrite(pos3, HIGH);
digitalWrite(neg1, LOW);
digitalWrite(neg2, LOW);
digitalWrite(neg3, HIGH);
digitalWrite(neg4, LOW);
digitalWrite(neg5, LOW);
digitalWrite(neg6, HIGH);
digitalWrite(neg7, LOW);
digitalWrite(neg8, LOW);
digitalWrite(neg9, HIGH);
delay(150);
digitalWrite(pos1, HIGH);
digitalWrite(pos2, HIGH);
digitalWrite(pos3, LOW);
digitalWrite(neg1, LOW);
digitalWrite(neg2, LOW);
digitalWrite(neg3, HIGH);
digitalWrite(neg4, LOW);
digitalWrite(neg5, LOW);
digitalWrite(neg6, HIGH);
digitalWrite(neg7, LOW);
digitalWrite(neg8, LOW);
digitalWrite(neg9, HIGH);
delay(150);
digitalWrite(pos1, HIGH);
digitalWrite(pos2, HIGH);
digitalWrite(pos3, LOW);
digitalWrite(neg1, LOW);
digitalWrite(neg2, LOW);
digitalWrite(neg3, HIGH);
digitalWrite(neg4, LOW);
digitalWrite(neg5, LOW);
digitalWrite(neg6, HIGH);
digitalWrite(neg7, LOW);
digitalWrite(neg8, LOW);
digitalWrite(neg9, HIGH);
delay(150);
digitalWrite(pos1, HIGH);
digitalWrite(pos2, LOW);
digitalWrite(pos3, HIGH);
digitalWrite(neg1, LOW);
digitalWrite(neg2, HIGH);
digitalWrite(neg3, LOW);
digitalWrite(neg4, LOW);
digitalWrite(neg5, HIGH);
digitalWrite(neg6, LOW);
digitalWrite(neg7, LOW);
digitalWrite(neg8, HIGH);
digitalWrite(neg9, LOW);
delay(150);
digitalWrite(pos1, LOW);
digitalWrite(pos2, HIGH);
digitalWrite(pos3, HIGH);
digitalWrite(neg1, HIGH);
digitalWrite(neg2, LOW);
digitalWrite(neg3, LOW);
digitalWrite(neg4, HIGH);
digitalWrite(neg5, LOW);
digitalWrite(neg6, LOW);
digitalWrite(neg7, HIGH);
digitalWrite(neg8, LOW);
digitalWrite(neg9, LOW);
delay(150);
digitalWrite(pos1, HIGH);
digitalWrite(pos2, LOW);
digitalWrite(pos3, HIGH);
digitalWrite(neg1, HIGH);
digitalWrite(neg2, LOW);
digitalWrite(neg3, LOW);
digitalWrite(neg4, HIGH);
digitalWrite(neg5, LOW);
digitalWrite(neg6, LOW);
digitalWrite(neg7, HIGH);
digitalWrite(neg8, LOW);
digitalWrite(neg9, LOW);
delay(150);
digitalWrite(pos1, HIGH);
digitalWrite(pos2, HIGH);
digitalWrite(pos3, LOW);
digitalWrite(neg1, HIGH);
digitalWrite(neg2, LOW);
digitalWrite(neg3, LOW);
digitalWrite(neg4, HIGH);
digitalWrite(neg5, LOW);
digitalWrite(neg6, LOW);
digitalWrite(neg7, HIGH);
digitalWrite(neg8, LOW);
digitalWrite(neg9, LOW);
delay(150);
digitalWrite(pos1, HIGH);
digitalWrite(pos2, LOW);
digitalWrite(pos3, HIGH);
digitalWrite(neg1, LOW);
digitalWrite(neg2, HIGH);
digitalWrite(neg3, LOW);
digitalWrite(neg4, LOW);
digitalWrite(neg5, HIGH);
digitalWrite(neg6, LOW);
digitalWrite(neg7, LOW);
digitalWrite(neg8, HIGH);
digitalWrite(neg9, LOW);
delay(150);
digitalWrite(pos1, LOW);
digitalWrite(pos2, HIGH);
digitalWrite(pos3, HIGH);
digitalWrite(neg1, LOW);
digitalWrite(neg2, LOW);
digitalWrite(neg3, HIGH);
digitalWrite(neg4, LOW);
digitalWrite(neg5, LOW);
digitalWrite(neg6, HIGH);
digitalWrite(neg7, LOW);
digitalWrite(neg8, LOW);
digitalWrite(neg9, HIGH);
delay(150);
digitalWrite(pos1, HIGH);
digitalWrite(pos2, LOW);
digitalWrite(pos3, HIGH);
digitalWrite(neg1, LOW);
digitalWrite(neg2, LOW);
digitalWrite(neg3, HIGH);
digitalWrite(neg4, LOW);
digitalWrite(neg5, LOW);
digitalWrite(neg6, HIGH);
digitalWrite(neg7, LOW);
digitalWrite(neg8, LOW);
digitalWrite(neg9, HIGH);
delay(150);
digitalWrite(pos1, HIGH);
digitalWrite(pos2, HIGH);
digitalWrite(pos3, LOW);
digitalWrite(neg1, LOW);
digitalWrite(neg2, LOW);
digitalWrite(neg3, HIGH);
digitalWrite(neg4, LOW);
digitalWrite(neg5, LOW);
digitalWrite(neg6, HIGH);
digitalWrite(neg7, LOW);
digitalWrite(neg8, LOW);
digitalWrite(neg9, HIGH);
delay(150);
digitalWrite(pos1, LOW);
digitalWrite(pos2, HIGH);
digitalWrite(pos3, HIGH);
digitalWrite(neg1, LOW);
digitalWrite(neg2, LOW);
digitalWrite(neg3, LOW);
digitalWrite(neg4, LOW);
digitalWrite(neg5, HIGH);
digitalWrite(neg6, LOW);
digitalWrite(neg7, LOW);
digitalWrite(neg8, LOW);
digitalWrite(neg9, LOW);
delay(150);
digitalWrite(pos1, HIGH);
digitalWrite(pos2, LOW);
digitalWrite(pos3, HIGH);
digitalWrite(neg1, LOW);
digitalWrite(neg2, LOW);
digitalWrite(neg3, LOW);
digitalWrite(neg4, LOW);
digitalWrite(neg5, HIGH);
digitalWrite(neg6, LOW);
digitalWrite(neg7, LOW);
digitalWrite(neg8, LOW);
digitalWrite(neg9, LOW);
delay(150);
digitalWrite(pos1, HIGH);
digitalWrite(pos2, HIGH);
digitalWrite(pos3, LOW);
digitalWrite(neg1, LOW);
digitalWrite(neg2, LOW);
digitalWrite(neg3, LOW);
digitalWrite(neg4, LOW);
digitalWrite(neg5, HIGH);
digitalWrite(neg6, LOW);
digitalWrite(neg7, LOW);
digitalWrite(neg8, LOW);
digitalWrite(neg9, LOW);
delay(150);
digitalWrite(pos1, HIGH);
digitalWrite(pos2, HIGH);
digitalWrite(pos3, LOW);
digitalWrite(neg1, HIGH);
digitalWrite(neg2, LOW);
digitalWrite(neg3, HIGH);
digitalWrite(neg4, LOW);
digitalWrite(neg5, HIGH);
digitalWrite(neg6, LOW);
digitalWrite(neg7, HIGH);
digitalWrite(neg8, LOW);
digitalWrite(neg9, HIGH);
delay(150);
digitalWrite(pos1, HIGH);
digitalWrite(pos2, LOW);
digitalWrite(pos3, HIGH);
digitalWrite(neg1, HIGH);
digitalWrite(neg2, LOW);
digitalWrite(neg3, HIGH);
digitalWrite(neg4, LOW);
digitalWrite(neg5, LOW);
digitalWrite(neg6, LOW);
digitalWrite(neg7, HIGH);
digitalWrite(neg8, LOW);
digitalWrite(neg9, HIGH);
delay(150);
digitalWrite(pos1, LOW);
digitalWrite(pos2, HIGH);
digitalWrite(pos3, HIGH);
digitalWrite(neg1, HIGH);
digitalWrite(neg2, LOW);
digitalWrite(neg3, HIGH);
digitalWrite(neg4, LOW);
digitalWrite(neg5, LOW);
digitalWrite(neg6, LOW);
digitalWrite(neg7, HIGH);
digitalWrite(neg8, LOW);
digitalWrite(neg9, HIGH);
delay(150);
digitalWrite(pos1, LOW);
digitalWrite(pos2, HIGH);
digitalWrite(pos3, HIGH);
digitalWrite(neg1, LOW);
digitalWrite(neg2, LOW);
digitalWrite(neg3, LOW);
digitalWrite(neg4, LOW);
digitalWrite(neg5, HIGH);
digitalWrite(neg6, LOW);
digitalWrite(neg7, LOW);
digitalWrite(neg8, LOW);
digitalWrite(neg9, LOW);
delay(150);
digitalWrite(pos1, HIGH);
digitalWrite(pos2, LOW);
digitalWrite(pos3, HIGH);
digitalWrite(neg1, LOW);
digitalWrite(neg2, LOW);
digitalWrite(neg3, LOW);
digitalWrite(neg4, LOW);
digitalWrite(neg5, HIGH);
digitalWrite(neg6, LOW);
digitalWrite(neg7, LOW);
digitalWrite(neg8, LOW);
digitalWrite(neg9, LOW);
delay(150);
digitalWrite(pos1, HIGH);
digitalWrite(pos2, HIGH);
digitalWrite(pos3, LOW);
digitalWrite(neg1, LOW);
digitalWrite(neg2, LOW);
digitalWrite(neg3, LOW);
digitalWrite(neg4, LOW);
digitalWrite(neg5, HIGH);
digitalWrite(neg6, LOW);
digitalWrite(neg7, LOW);
digitalWrite(neg8, LOW);
digitalWrite(neg9, LOW);
delay(150);
digitalWrite(pos1, HIGH);
digitalWrite(pos2, HIGH);
digitalWrite(pos3, LOW);
digitalWrite(neg1, HIGH);
digitalWrite(neg2, LOW);
digitalWrite(neg3, HIGH);
digitalWrite(neg4, LOW);
digitalWrite(neg5, HIGH);
digitalWrite(neg6, LOW);
digitalWrite(neg7, HIGH);
digitalWrite(neg8, LOW);
digitalWrite(neg9, HIGH);
delay(150);
digitalWrite(pos1, HIGH);
digitalWrite(pos2, LOW);
digitalWrite(pos3, HIGH);
digitalWrite(neg1, HIGH);
digitalWrite(neg2, LOW);
digitalWrite(neg3, HIGH);
digitalWrite(neg4, LOW);
digitalWrite(neg5, LOW);
digitalWrite(neg6, LOW);
digitalWrite(neg7, HIGH);
digitalWrite(neg8, LOW);
digitalWrite(neg9, HIGH);
delay(150);
digitalWrite(pos1, LOW);
digitalWrite(pos2, HIGH);
digitalWrite(pos3, HIGH);
digitalWrite(neg1, HIGH);
digitalWrite(neg2, LOW);
digitalWrite(neg3, HIGH);
digitalWrite(neg4, LOW);
digitalWrite(neg5, LOW);
digitalWrite(neg6, LOW);
digitalWrite(neg7, HIGH);
digitalWrite(neg8, LOW);
digitalWrite(neg9, HIGH);
delay(150);
digitalWrite(pos1, LOW);
digitalWrite(pos2, HIGH);
digitalWrite(pos3, HIGH);
digitalWrite(neg1, HIGH);
digitalWrite(neg2, LOW);
digitalWrite(neg3, LOW);
digitalWrite(neg4, LOW);
digitalWrite(neg5, LOW);
digitalWrite(neg6, LOW);
digitalWrite(neg7, LOW);
digitalWrite(neg8, LOW);
digitalWrite(neg9, LOW);
delay(delay_time);
digitalWrite(neg1, LOW);
digitalWrite(neg2, HIGH);
digitalWrite(neg3, LOW);
digitalWrite(neg4, LOW);
digitalWrite(neg5, LOW);
digitalWrite(neg6, LOW);
digitalWrite(neg7, LOW);
digitalWrite(neg8, LOW);
digitalWrite(neg9, LOW);
delay(delay_time);
digitalWrite(neg1, LOW);
digitalWrite(neg2, LOW);
digitalWrite(neg3, HIGH);
digitalWrite(neg4, LOW);
digitalWrite(neg5, LOW);
digitalWrite(neg6, LOW);
digitalWrite(neg7, LOW);
digitalWrite(neg8, LOW);
digitalWrite(neg9, LOW);
delay(delay_time);
digitalWrite(neg1, LOW);
digitalWrite(neg2, LOW);
digitalWrite(neg3, LOW);
digitalWrite(neg4, LOW);
digitalWrite(neg5, LOW);
digitalWrite(neg6, HIGH);
digitalWrite(neg7, LOW);
digitalWrite(neg8, LOW);
digitalWrite(neg9, LOW);
delay(delay_time);
digitalWrite(neg1, LOW);
digitalWrite(neg2, LOW);
digitalWrite(neg3, LOW);
digitalWrite(neg4, LOW);
digitalWrite(neg5, HIGH);
digitalWrite(neg6, LOW);
digitalWrite(neg7, LOW);
digitalWrite(neg8, LOW);
digitalWrite(neg9, LOW);
delay(delay_time);
digitalWrite(neg1, LOW);
digitalWrite(neg2, LOW);
digitalWrite(neg3, LOW);
digitalWrite(neg4, HIGH);
digitalWrite(neg5, LOW);
digitalWrite(neg6, LOW);
digitalWrite(neg7, LOW);
digitalWrite(neg8, LOW);
digitalWrite(neg9, LOW);
delay(delay_time);
digitalWrite(neg1, LOW);
digitalWrite(neg2, LOW);
digitalWrite(neg3, LOW);
digitalWrite(neg4, LOW);
digitalWrite(neg5, LOW);
digitalWrite(neg6, LOW);
digitalWrite(neg7, HIGH);
digitalWrite(neg8, LOW);
digitalWrite(neg9, LOW);
delay(delay_time);
digitalWrite(neg1, LOW);
digitalWrite(neg2, LOW);
digitalWrite(neg3, LOW);
digitalWrite(neg4, LOW);
digitalWrite(neg5, LOW);
digitalWrite(neg6, LOW);
digitalWrite(neg7, LOW);
digitalWrite(neg8, HIGH);
digitalWrite(neg9, LOW);
delay(delay_time);
digitalWrite(neg1, LOW);
digitalWrite(neg2, LOW);
digitalWrite(neg3, LOW);
digitalWrite(neg4, LOW);
digitalWrite(neg5, LOW);
digitalWrite(neg6, LOW);
digitalWrite(neg7, LOW);
digitalWrite(neg8, LOW);
digitalWrite(neg9, HIGH);
delay(delay_time);
digitalWrite(pos1, HIGH);
digitalWrite(pos2, LOW);
digitalWrite(pos3, HIGH);
digitalWrite(neg1, LOW);
digitalWrite(neg2, LOW);
digitalWrite(neg3, LOW);
digitalWrite(neg4, LOW);
digitalWrite(neg5, LOW);
digitalWrite(neg6, LOW);
digitalWrite(neg7, LOW);
digitalWrite(neg8, LOW);
digitalWrite(neg9, HIGH);
delay(delay_time);
digitalWrite(neg1, LOW);
digitalWrite(neg2, LOW);
digitalWrite(neg3, LOW);
digitalWrite(neg4, LOW);
digitalWrite(neg5, LOW);
digitalWrite(neg6, LOW);
digitalWrite(neg7, LOW);
digitalWrite(neg8, HIGH);
digitalWrite(neg9, LOW);
delay(delay_time);
digitalWrite(neg1, LOW);
digitalWrite(neg2, LOW);
digitalWrite(neg3, LOW);
digitalWrite(neg4, LOW);
digitalWrite(neg5, LOW);
digitalWrite(neg6, LOW);
digitalWrite(neg7, HIGH);
digitalWrite(neg8, LOW);
digitalWrite(neg9, LOW);
delay(delay_time);
digitalWrite(neg1, LOW);
digitalWrite(neg2, LOW);
digitalWrite(neg3, LOW);
digitalWrite(neg4, HIGH);
digitalWrite(neg5, LOW);
digitalWrite(neg6, LOW);
digitalWrite(neg7, LOW);
digitalWrite(neg8, LOW);
digitalWrite(neg9, LOW);
delay(delay_time);
digitalWrite(neg1, LOW);
digitalWrite(neg2, LOW);
digitalWrite(neg3, LOW);
digitalWrite(neg4, LOW);
digitalWrite(neg5, HIGH);
digitalWrite(neg6, LOW);
digitalWrite(neg7, LOW);
digitalWrite(neg8, LOW);
digitalWrite(neg9, LOW);
delay(delay_time);
digitalWrite(neg1, LOW);
digitalWrite(neg2, LOW);
digitalWrite(neg3, LOW);
digitalWrite(neg4, LOW);
digitalWrite(neg5, LOW);
digitalWrite(neg6, HIGH);
digitalWrite(neg7, LOW);
digitalWrite(neg8, LOW);
digitalWrite(neg9, LOW);
delay(delay_time);
digitalWrite(neg1, LOW);
digitalWrite(neg2, LOW);
digitalWrite(neg3, HIGH);
digitalWrite(neg4, LOW);
digitalWrite(neg5, LOW);
digitalWrite(neg6, LOW);
digitalWrite(neg7, LOW);
digitalWrite(neg8, LOW);
digitalWrite(neg9, LOW);
delay(delay_time);
digitalWrite(neg1, LOW);
digitalWrite(neg2, HIGH);
digitalWrite(neg3, LOW);
digitalWrite(neg4, LOW);
digitalWrite(neg5, LOW);
digitalWrite(neg6, LOW);
digitalWrite(neg7, LOW);
digitalWrite(neg8, LOW);
digitalWrite(neg9, LOW);
delay(delay_time);
digitalWrite(neg1, HIGH);
digitalWrite(neg2, LOW);
digitalWrite(neg3, LOW);
digitalWrite(neg4, LOW);
digitalWrite(neg5, LOW);
digitalWrite(neg6, LOW);
digitalWrite(neg7, LOW);
digitalWrite(neg8, LOW);
digitalWrite(neg9, LOW);
delay(delay_time);
digitalWrite(pos1, HIGH);
digitalWrite(pos2, HIGH);
digitalWrite(pos3, LOW);
digitalWrite(neg1, HIGH);
digitalWrite(neg2, LOW);
digitalWrite(neg3, LOW);
digitalWrite(neg4, LOW);
digitalWrite(neg5, LOW);
digitalWrite(neg6, LOW);
digitalWrite(neg7, LOW);
digitalWrite(neg8, LOW);
digitalWrite(neg9, LOW);
delay(delay_time);
digitalWrite(neg1, LOW);
digitalWrite(neg2, HIGH);
digitalWrite(neg3, LOW);
digitalWrite(neg4, LOW);
digitalWrite(neg5, LOW);
digitalWrite(neg6, LOW);
digitalWrite(neg7, LOW);
digitalWrite(neg8, LOW);
digitalWrite(neg9, LOW);
delay(delay_time);
digitalWrite(neg1, LOW);
digitalWrite(neg2, LOW);
digitalWrite(neg3, HIGH);
digitalWrite(neg4, LOW);
digitalWrite(neg5, LOW);
digitalWrite(neg6, LOW);
digitalWrite(neg7, LOW);
digitalWrite(neg8, LOW);
digitalWrite(neg9, LOW);
delay(delay_time);
digitalWrite(neg1, LOW);
digitalWrite(neg2, LOW);
digitalWrite(neg3, LOW);
digitalWrite(neg4, LOW);
digitalWrite(neg5, LOW);
digitalWrite(neg6, HIGH);
digitalWrite(neg7, LOW);
digitalWrite(neg8, LOW);
digitalWrite(neg9, LOW);
delay(delay_time);
digitalWrite(neg1, LOW);
digitalWrite(neg2, LOW);
digitalWrite(neg3, LOW);
digitalWrite(neg4, LOW);
digitalWrite(neg5, HIGH);
digitalWrite(neg6, LOW);
digitalWrite(neg7, LOW);
digitalWrite(neg8, LOW);
digitalWrite(neg9, LOW);
delay(delay_time);
digitalWrite(neg1, LOW);
digitalWrite(neg2, LOW);
digitalWrite(neg3, LOW);
digitalWrite(neg4, HIGH);
digitalWrite(neg5, LOW);
digitalWrite(neg6, LOW);
digitalWrite(neg7, LOW);
digitalWrite(neg8, LOW);
digitalWrite(neg9, LOW);
delay(delay_time);
digitalWrite(neg1, LOW);
digitalWrite(neg2, LOW);
digitalWrite(neg3, LOW);
digitalWrite(neg4, LOW);
digitalWrite(neg5, LOW);
digitalWrite(neg6, LOW);
digitalWrite(neg7, HIGH);
digitalWrite(neg8, LOW);
digitalWrite(neg9, LOW);
delay(delay_time);
digitalWrite(neg1, LOW);
digitalWrite(neg2, LOW);
digitalWrite(neg3, LOW);
digitalWrite(neg4, LOW);
digitalWrite(neg5, LOW);
digitalWrite(neg6, LOW);
digitalWrite(neg7, LOW);
digitalWrite(neg8, HIGH);
digitalWrite(neg9, LOW);
delay(delay_time);
digitalWrite(neg1, LOW);
digitalWrite(neg2, LOW);
digitalWrite(neg3, LOW);
digitalWrite(neg4, LOW);
digitalWrite(neg5, LOW);
digitalWrite(neg6, LOW);
digitalWrite(neg7, LOW);
digitalWrite(neg8, LOW);
digitalWrite(neg9, HIGH);
delay(delay_time);
digitalWrite(neg1, LOW);
digitalWrite(neg2, LOW);
digitalWrite(neg3, LOW);
digitalWrite(neg4, LOW);
digitalWrite(neg5, LOW);
digitalWrite(neg6, HIGH);
digitalWrite(neg7, LOW);
digitalWrite(neg8, LOW);
digitalWrite(neg9, LOW);
delay(delay_time);
digitalWrite(neg1, LOW);
digitalWrite(neg2, LOW);
digitalWrite(neg3, HIGH);
digitalWrite(neg4, LOW);
digitalWrite(neg5, LOW);
digitalWrite(neg6, LOW);
digitalWrite(neg7, LOW);
digitalWrite(neg8, LOW);
digitalWrite(neg9, LOW);
delay(delay_time);
digitalWrite(neg1, LOW);
digitalWrite(neg2, HIGH);
digitalWrite(neg3, LOW);
digitalWrite(neg4, LOW);
digitalWrite(neg5, LOW);
digitalWrite(neg6, LOW);
digitalWrite(neg7, LOW);
digitalWrite(neg8, LOW);
digitalWrite(neg9, LOW);
delay(delay_time);
digitalWrite(neg1, LOW);
digitalWrite(neg2, LOW);
digitalWrite(neg3, LOW);
digitalWrite(neg4, LOW);
digitalWrite(neg5, HIGH);
digitalWrite(neg6, LOW);
digitalWrite(neg7, LOW);
digitalWrite(neg8, LOW);
digitalWrite(neg9, LOW);
delay(delay_time);
digitalWrite(neg1, LOW);
digitalWrite(neg2, LOW);
digitalWrite(neg3, LOW);
digitalWrite(neg4, LOW);
digitalWrite(neg5, LOW);
digitalWrite(neg6, LOW);
digitalWrite(neg7, LOW);
digitalWrite(neg8, HIGH);
digitalWrite(neg9, LOW);
delay(delay_time);
digitalWrite(neg1, LOW);
digitalWrite(neg2, LOW);
digitalWrite(neg3, LOW);
digitalWrite(neg4, LOW);
digitalWrite(neg5, LOW);
digitalWrite(neg6, LOW);
digitalWrite(neg7, HIGH);
digitalWrite(neg8, LOW);
digitalWrite(neg9, LOW);
delay(delay_time);
digitalWrite(neg1, LOW);
digitalWrite(neg2, LOW);
digitalWrite(neg3, LOW);
digitalWrite(neg4, HIGH);
digitalWrite(neg5, LOW);
digitalWrite(neg6, LOW);
digitalWrite(neg7, LOW);
digitalWrite(neg8, LOW);
digitalWrite(neg9, LOW);
delay(delay_time);
digitalWrite(neg1, HIGH);
digitalWrite(neg2, LOW);
digitalWrite(neg3, LOW);
digitalWrite(neg4, LOW);
digitalWrite(neg5, LOW);
digitalWrite(neg6, LOW);
digitalWrite(neg7, LOW);
digitalWrite(neg8, LOW);
digitalWrite(neg9, LOW);
delay(delay_time);
digitalWrite(pos1, HIGH);
digitalWrite(pos2, LOW);
digitalWrite(pos3, HIGH);
digitalWrite(neg1, HIGH);
digitalWrite(neg2, LOW);
digitalWrite(neg3, LOW);
digitalWrite(neg4, LOW);
digitalWrite(neg5, LOW);
digitalWrite(neg6, LOW);
digitalWrite(neg7, LOW);
digitalWrite(neg8, LOW);
digitalWrite(neg9, LOW);
delay(delay_time);
digitalWrite(neg1, LOW);
digitalWrite(neg2, LOW);
digitalWrite(neg3, LOW);
digitalWrite(neg4, HIGH);
digitalWrite(neg5, LOW);
digitalWrite(neg6, LOW);
digitalWrite(neg7, LOW);
digitalWrite(neg8, LOW);
digitalWrite(neg9, LOW);
delay(delay_time);
digitalWrite(neg1, LOW);
digitalWrite(neg2, LOW);
digitalWrite(neg3, LOW);
digitalWrite(neg4, LOW);
digitalWrite(neg5, LOW);
digitalWrite(neg6, LOW);
digitalWrite(neg7, HIGH);
digitalWrite(neg8, LOW);
digitalWrite(neg9, LOW);
delay(delay_time);
digitalWrite(neg1, LOW);
digitalWrite(neg2, LOW);
digitalWrite(neg3, LOW);
digitalWrite(neg4, LOW);
digitalWrite(neg5, LOW);
digitalWrite(neg6, LOW);
digitalWrite(neg7, LOW);
digitalWrite(neg8, HIGH);
digitalWrite(neg9, LOW);
delay(delay_time);
digitalWrite(neg1, LOW);
digitalWrite(neg2, LOW);
digitalWrite(neg3, LOW);
digitalWrite(neg4, LOW);
digitalWrite(neg5, HIGH);
digitalWrite(neg6, LOW);
digitalWrite(neg7, LOW);
digitalWrite(neg8, LOW);
digitalWrite(neg9, LOW);
delay(delay_time);
digitalWrite(neg1, LOW);
digitalWrite(neg2, HIGH);
digitalWrite(neg3, LOW);
digitalWrite(neg4, LOW);
digitalWrite(neg5, LOW);
digitalWrite(neg6, LOW);
digitalWrite(neg7, LOW);
digitalWrite(neg8, LOW);
digitalWrite(neg9, LOW);
delay(delay_time);
digitalWrite(neg1, LOW);
digitalWrite(neg2, LOW);
digitalWrite(neg3, HIGH);
digitalWrite(neg4, LOW);
digitalWrite(neg5, LOW);
digitalWrite(neg6, LOW);
digitalWrite(neg7, LOW);
digitalWrite(neg8, LOW);
digitalWrite(neg9, LOW);
delay(delay_time);
digitalWrite(neg1, LOW);
digitalWrite(neg2, LOW);
digitalWrite(neg3, LOW);
digitalWrite(neg4, LOW);
digitalWrite(neg5, LOW);
digitalWrite(neg6, HIGH);
digitalWrite(neg7, LOW);
digitalWrite(neg8, LOW);
digitalWrite(neg9, LOW);
delay(delay_time);
digitalWrite(neg1, LOW);
digitalWrite(neg2, LOW);
digitalWrite(neg3, LOW);
digitalWrite(neg4, LOW);
digitalWrite(neg5, LOW);
digitalWrite(neg6, LOW);
digitalWrite(neg7, LOW);
digitalWrite(neg8, LOW);
digitalWrite(neg9, HIGH);
delay(delay_time);
digitalWrite(pos1, LOW);
digitalWrite(pos2, HIGH);
digitalWrite(pos3, HIGH);
digitalWrite(neg1, LOW);
digitalWrite(neg2, LOW);
digitalWrite(neg3, LOW);
digitalWrite(neg4, LOW);
digitalWrite(neg5, LOW);
digitalWrite(neg6, LOW);
digitalWrite(neg7, LOW);
digitalWrite(neg8, LOW);
digitalWrite(neg9, HIGH);
delay(delay_time);
digitalWrite(neg1, LOW);
digitalWrite(neg2, LOW);
digitalWrite(neg3, LOW);
digitalWrite(neg4, LOW);
digitalWrite(neg5, LOW);
digitalWrite(neg6, HIGH);
digitalWrite(neg7, LOW);
digitalWrite(neg8, LOW);
digitalWrite(neg9, LOW);
delay(delay_time);
digitalWrite(neg1, LOW);
digitalWrite(neg2, LOW);
digitalWrite(neg3, HIGH);
digitalWrite(neg4, LOW);
digitalWrite(neg5, LOW);
digitalWrite(neg6, LOW);
digitalWrite(neg7, LOW);
digitalWrite(neg8, LOW);
digitalWrite(neg9, LOW);
delay(delay_time);
digitalWrite(neg1, LOW);
digitalWrite(neg2, HIGH);
digitalWrite(neg3, LOW);
digitalWrite(neg4, LOW);
digitalWrite(neg5, LOW);
digitalWrite(neg6, LOW);
digitalWrite(neg7, LOW);
digitalWrite(neg8, LOW);
digitalWrite(neg9, LOW);
delay(delay_time);
digitalWrite(neg1, LOW);
digitalWrite(neg2, LOW);
digitalWrite(neg3, LOW);
digitalWrite(neg4, LOW);
digitalWrite(neg5, HIGH);
digitalWrite(neg6, LOW);
digitalWrite(neg7, LOW);
digitalWrite(neg8, LOW);
digitalWrite(neg9, LOW);
delay(delay_time);
digitalWrite(neg1, LOW);
digitalWrite(neg2, LOW);
digitalWrite(neg3, LOW);
digitalWrite(neg4, LOW);
digitalWrite(neg5, LOW);
digitalWrite(neg6, LOW);
digitalWrite(neg7, LOW);
digitalWrite(neg8, HIGH);
digitalWrite(neg9, LOW);
delay(delay_time);
digitalWrite(neg1, LOW);
digitalWrite(neg2, LOW);
digitalWrite(neg3, LOW);
digitalWrite(neg4, LOW);
digitalWrite(neg5, LOW);
digitalWrite(neg6, LOW);
digitalWrite(neg7, HIGH);
digitalWrite(neg8, LOW);
digitalWrite(neg9, LOW);
delay(delay_time);
digitalWrite(neg1, LOW);
digitalWrite(neg2, LOW);
digitalWrite(neg3, LOW);
digitalWrite(neg4, HIGH);
digitalWrite(neg5, LOW);
digitalWrite(neg6, LOW);
digitalWrite(neg7, LOW);
digitalWrite(neg8, LOW);
digitalWrite(neg9, LOW);
delay(delay_time);
digitalWrite(neg1, HIGH);
digitalWrite(neg2, LOW);
digitalWrite(neg3, LOW);
digitalWrite(neg4, LOW);
digitalWrite(neg5, LOW);
digitalWrite(neg6, LOW);
digitalWrite(neg7, LOW);
digitalWrite(neg8, LOW);
digitalWrite(neg9, LOW);
delay(delay_time);
digitalWrite(pos1, LOW);
digitalWrite(pos2, LOW);
digitalWrite(pos3, LOW);
digitalWrite(neg1, HIGH);
digitalWrite(neg2, LOW);
digitalWrite(neg3, LOW);
digitalWrite(neg4, LOW);
digitalWrite(neg5, HIGH);
digitalWrite(neg6, LOW);
digitalWrite(neg7, LOW);
digitalWrite(neg8, LOW);
digitalWrite(neg9, HIGH);
delay(200);
digitalWrite(pos1, LOW);
digitalWrite(pos2, LOW);
digitalWrite(pos3, LOW);
digitalWrite(neg1, LOW);
digitalWrite(neg2, HIGH);
digitalWrite(neg3, LOW);
digitalWrite(neg4, LOW);
digitalWrite(neg5, HIGH);
digitalWrite(neg6, LOW);
digitalWrite(neg7, LOW);
digitalWrite(neg8, HIGH);
digitalWrite(neg9, LOW);
delay(200);
digitalWrite(pos1, LOW);
digitalWrite(pos2, LOW);
digitalWrite(pos3, LOW);
digitalWrite(neg1, LOW);
digitalWrite(neg2, LOW);
digitalWrite(neg3, HIGH);
digitalWrite(neg4, LOW);
digitalWrite(neg5, HIGH);
digitalWrite(neg6, LOW);
digitalWrite(neg7, HIGH);
digitalWrite(neg8, LOW);
digitalWrite(neg9, LOW);
delay(200);
digitalWrite(pos1, LOW);
digitalWrite(pos2, LOW);
digitalWrite(pos3, LOW);
digitalWrite(neg1, LOW);
digitalWrite(neg2, LOW);
digitalWrite(neg3, LOW);
digitalWrite(neg4, HIGH);
digitalWrite(neg5, HIGH);
digitalWrite(neg6, HIGH);
digitalWrite(neg7, LOW);
digitalWrite(neg8, LOW);
digitalWrite(neg9, LOW);
delay(200);
digitalWrite(pos1, LOW);
digitalWrite(pos2, LOW);
digitalWrite(pos3, LOW);
digitalWrite(neg1, HIGH);
digitalWrite(neg2, LOW);
digitalWrite(neg3, LOW);
digitalWrite(neg4, LOW);
digitalWrite(neg5, HIGH);
digitalWrite(neg6, LOW);
digitalWrite(neg7, LOW);
digitalWrite(neg8, LOW);
digitalWrite(neg9, HIGH);
delay(200);
digitalWrite(pos1, LOW);
digitalWrite(pos2, LOW);
digitalWrite(pos3, LOW);
digitalWrite(neg1, HIGH);
digitalWrite(neg2, LOW);
digitalWrite(neg3, LOW);
digitalWrite(neg4, LOW);
digitalWrite(neg5, HIGH);
digitalWrite(neg6, LOW);
digitalWrite(neg7, LOW);
digitalWrite(neg8, LOW);
digitalWrite(neg9, HIGH);
delay(200);
digitalWrite(pos1, LOW);
digitalWrite(pos2, LOW);
digitalWrite(pos3, LOW);
digitalWrite(neg1, LOW);
digitalWrite(neg2, HIGH);
digitalWrite(neg3, LOW);
digitalWrite(neg4, LOW);
digitalWrite(neg5, HIGH);
digitalWrite(neg6, LOW);
digitalWrite(neg7, LOW);
digitalWrite(neg8, HIGH);
digitalWrite(neg9, LOW);
delay(200);
digitalWrite(pos1, LOW);
digitalWrite(pos2, LOW);
digitalWrite(pos3, LOW);
digitalWrite(neg1, LOW);
digitalWrite(neg2, LOW);
digitalWrite(neg3, HIGH);
digitalWrite(neg4, LOW);
digitalWrite(neg5, HIGH);
digitalWrite(neg6, LOW);
digitalWrite(neg7, HIGH);
digitalWrite(neg8, LOW);
digitalWrite(neg9, LOW);
delay(200);
digitalWrite(pos1, LOW);
digitalWrite(pos2, LOW);
digitalWrite(pos3, LOW);
digitalWrite(neg1, LOW);
digitalWrite(neg2, LOW);
digitalWrite(neg3, LOW);
digitalWrite(neg4, HIGH);
digitalWrite(neg5, HIGH);
digitalWrite(neg6, HIGH);
digitalWrite(neg7, LOW);
digitalWrite(neg8, LOW);
digitalWrite(neg9, LOW);
delay(200);
digitalWrite(pos1, LOW);
digitalWrite(pos2, LOW);
digitalWrite(pos3, LOW);
digitalWrite(neg1, HIGH);
digitalWrite(neg2, LOW);
digitalWrite(neg3, LOW);
digitalWrite(neg4, LOW);
digitalWrite(neg5, HIGH);
digitalWrite(neg6, LOW);
digitalWrite(neg7, LOW);
digitalWrite(neg8, LOW);
digitalWrite(neg9, HIGH);
delay(200);
digitalWrite(pos1, LOW);
digitalWrite(pos2, LOW);
digitalWrite(pos3, LOW);
digitalWrite(neg1, HIGH);
digitalWrite(neg2, LOW);
digitalWrite(neg3, LOW);
digitalWrite(neg4, LOW);
digitalWrite(neg5, HIGH);
digitalWrite(neg6, LOW);
digitalWrite(neg7, LOW);
digitalWrite(neg8, LOW);
digitalWrite(neg9, HIGH);
delay(200);
digitalWrite(pos1, LOW);
digitalWrite(pos2, LOW);
digitalWrite(pos3, LOW);
digitalWrite(neg1, LOW);
digitalWrite(neg2, HIGH);
digitalWrite(neg3, LOW);
digitalWrite(neg4, LOW);
digitalWrite(neg5, HIGH);
digitalWrite(neg6, LOW);
digitalWrite(neg7, LOW);
digitalWrite(neg8, HIGH);
digitalWrite(neg9, LOW);
delay(200);
digitalWrite(pos1, LOW);
digitalWrite(pos2, LOW);
digitalWrite(pos3, LOW);
digitalWrite(neg1, LOW);
digitalWrite(neg2, LOW);
digitalWrite(neg3, HIGH);
digitalWrite(neg4, LOW);
digitalWrite(neg5, HIGH);
digitalWrite(neg6, LOW);
digitalWrite(neg7, HIGH);
digitalWrite(neg8, LOW);
digitalWrite(neg9, LOW);
delay(200);
digitalWrite(pos1, LOW);
digitalWrite(pos2, LOW);
digitalWrite(pos3, LOW);
digitalWrite(neg1, LOW);
digitalWrite(neg2, LOW);
digitalWrite(neg3, LOW);
digitalWrite(neg4, HIGH);
digitalWrite(neg5, HIGH);
digitalWrite(neg6, HIGH);
digitalWrite(neg7, LOW);
digitalWrite(neg8, LOW);
digitalWrite(neg9, LOW);
delay(200);
digitalWrite(pos1, LOW);
digitalWrite(pos2, LOW);
digitalWrite(pos3, LOW);
digitalWrite(neg1, HIGH);
digitalWrite(neg2, LOW);
digitalWrite(neg3, LOW);
digitalWrite(neg4, LOW);
digitalWrite(neg5, HIGH);
digitalWrite(neg6, LOW);
digitalWrite(neg7, LOW);
digitalWrite(neg8, LOW);
digitalWrite(neg9, HIGH);
delay(200);
digitalWrite(pos1, LOW);
digitalWrite(pos2, LOW);
digitalWrite(pos3, LOW);
digitalWrite(neg1, HIGH);
digitalWrite(neg2, LOW);
digitalWrite(neg3, LOW);
digitalWrite(neg4, LOW);
digitalWrite(neg5, HIGH);
digitalWrite(neg6, LOW);
digitalWrite(neg7, LOW);
digitalWrite(neg8, LOW);
digitalWrite(neg9, HIGH);
delay(200);
digitalWrite(pos1, LOW);
digitalWrite(pos2, LOW);
digitalWrite(pos3, LOW);
digitalWrite(neg1, LOW);
digitalWrite(neg2, HIGH);
digitalWrite(neg3, LOW);
digitalWrite(neg4, LOW);
digitalWrite(neg5, HIGH);
digitalWrite(neg6, LOW);
digitalWrite(neg7, LOW);
digitalWrite(neg8, HIGH);
digitalWrite(neg9, LOW);
delay(200);
digitalWrite(pos1, LOW);
digitalWrite(pos2, LOW);
digitalWrite(pos3, LOW);
digitalWrite(neg1, LOW);
digitalWrite(neg2, LOW);
digitalWrite(neg3, HIGH);
digitalWrite(neg4, LOW);
digitalWrite(neg5, HIGH);
digitalWrite(neg6, LOW);
digitalWrite(neg7, HIGH);
digitalWrite(neg8, LOW);
digitalWrite(neg9, LOW);
delay(200);
digitalWrite(pos1, LOW);
digitalWrite(pos2, LOW);
digitalWrite(pos3, LOW);
digitalWrite(neg1, LOW);
digitalWrite(neg2, LOW);
digitalWrite(neg3, LOW);
digitalWrite(neg4, HIGH);
digitalWrite(neg5, HIGH);
digitalWrite(neg6, HIGH);
digitalWrite(neg7, LOW);
digitalWrite(neg8, LOW);
digitalWrite(neg9, LOW);
delay(200);
digitalWrite(pos1, LOW);
digitalWrite(pos2, LOW);
digitalWrite(pos3, LOW);
digitalWrite(neg1, HIGH);
digitalWrite(neg2, LOW);
digitalWrite(neg3, LOW);
digitalWrite(neg4, LOW);
digitalWrite(neg5, HIGH);
digitalWrite(neg6, LOW);
digitalWrite(neg7, LOW);
digitalWrite(neg8, LOW);
digitalWrite(neg9, HIGH);
delay(200);
digitalWrite(pos1, LOW);
digitalWrite(pos2, LOW);
digitalWrite(pos3, LOW);
digitalWrite(neg1, HIGH);
digitalWrite(neg2, LOW);
digitalWrite(neg3, LOW);
digitalWrite(neg4, LOW);
digitalWrite(neg5, HIGH);
digitalWrite(neg6, LOW);
digitalWrite(neg7, LOW);
digitalWrite(neg8, LOW);
digitalWrite(neg9, HIGH);
delay(200);
digitalWrite(pos1, LOW);
digitalWrite(pos2, LOW);
digitalWrite(pos3, LOW);
digitalWrite(neg1, LOW);
digitalWrite(neg2, HIGH);
digitalWrite(neg3, LOW);
digitalWrite(neg4, LOW);
digitalWrite(neg5, HIGH);
digitalWrite(neg6, LOW);
digitalWrite(neg7, LOW);
digitalWrite(neg8, HIGH);
digitalWrite(neg9, LOW);
delay(200);
digitalWrite(pos1, LOW);
digitalWrite(pos2, LOW);
digitalWrite(pos3, LOW);
digitalWrite(neg1, LOW);
digitalWrite(neg2, LOW);
digitalWrite(neg3, HIGH);
digitalWrite(neg4, LOW);
digitalWrite(neg5, HIGH);
digitalWrite(neg6, LOW);
digitalWrite(neg7, HIGH);
digitalWrite(neg8, LOW);
digitalWrite(neg9, LOW);
delay(200);
digitalWrite(pos1, LOW);
digitalWrite(pos2, LOW);
digitalWrite(pos3, LOW);
digitalWrite(neg1, LOW);
digitalWrite(neg2, LOW);
digitalWrite(neg3, LOW);
digitalWrite(neg4, HIGH);
digitalWrite(neg5, HIGH);
digitalWrite(neg6, HIGH);
digitalWrite(neg7, LOW);
digitalWrite(neg8, LOW);
digitalWrite(neg9, LOW);
delay(200);
digitalWrite(pos1, LOW);
digitalWrite(pos2, LOW);
digitalWrite(pos3, LOW);
digitalWrite(neg1, HIGH);
digitalWrite(neg2, LOW);
digitalWrite(neg3, LOW);
digitalWrite(neg4, LOW);
digitalWrite(neg5, HIGH);
digitalWrite(neg6, LOW);
digitalWrite(neg7, LOW);
digitalWrite(neg8, LOW);
digitalWrite(neg9, HIGH);
delay(200);
digitalWrite(pos1, LOW);
digitalWrite(pos2, LOW);
digitalWrite(pos3, LOW);
digitalWrite(neg1, HIGH);
digitalWrite(neg2, HIGH);
digitalWrite(neg3, HIGH);
digitalWrite(neg4, LOW);
digitalWrite(neg5, LOW);
digitalWrite(neg6, LOW);
digitalWrite(neg7, LOW);
digitalWrite(neg8, LOW);
digitalWrite(neg9, LOW);
delay(150);
digitalWrite(pos1, LOW);
digitalWrite(pos2, LOW);
digitalWrite(pos3, LOW);
digitalWrite(neg1, LOW);
digitalWrite(neg2, LOW);
digitalWrite(neg3, LOW);
digitalWrite(neg4, HIGH);
digitalWrite(neg5, HIGH);
digitalWrite(neg6, HIGH);
digitalWrite(neg7, LOW);
digitalWrite(neg8, LOW);
digitalWrite(neg9, LOW);
delay(150);
digitalWrite(pos1, LOW);
digitalWrite(pos2, LOW);
digitalWrite(pos3, LOW);
digitalWrite(neg1, LOW);
digitalWrite(neg2, LOW);
digitalWrite(neg3, LOW);
digitalWrite(neg4, LOW);
digitalWrite(neg5, LOW);
digitalWrite(neg6, LOW);
digitalWrite(neg7, HIGH);
digitalWrite(neg8, HIGH);
digitalWrite(neg9, HIGH);
delay(150);
digitalWrite(pos1, LOW);
digitalWrite(pos2, LOW);
digitalWrite(pos3, LOW);
digitalWrite(neg1, HIGH);
digitalWrite(neg2, LOW);
digitalWrite(neg3, LOW);
digitalWrite(neg4, HIGH);
digitalWrite(neg5, LOW);
digitalWrite(neg6, LOW);
digitalWrite(neg7, HIGH);
digitalWrite(neg8, LOW);
digitalWrite(neg9, LOW);
delay(150);
digitalWrite(pos1, LOW);
digitalWrite(pos2, LOW);
digitalWrite(pos3, LOW);
digitalWrite(neg1, LOW);
digitalWrite(neg2, HIGH);
digitalWrite(neg3, LOW);
digitalWrite(neg4, LOW);
digitalWrite(neg5, HIGH);
digitalWrite(neg6, LOW);
digitalWrite(neg7, LOW);
digitalWrite(neg8, HIGH);
digitalWrite(neg9, LOW);
delay(150);
digitalWrite(pos1, LOW);
digitalWrite(pos2, LOW);
digitalWrite(pos3, LOW);
digitalWrite(neg1, LOW);
digitalWrite(neg2, LOW);
digitalWrite(neg3, HIGH);
digitalWrite(neg4, LOW);
digitalWrite(neg5, LOW);
digitalWrite(neg6, HIGH);
digitalWrite(neg7, LOW);
digitalWrite(neg8, LOW);
digitalWrite(neg9, HIGH);
delay(150);
digitalWrite(pos1, LOW);
digitalWrite(pos2, LOW);
digitalWrite(pos3, LOW);
digitalWrite(neg1, LOW);
digitalWrite(neg2, LOW);
digitalWrite(neg3, LOW);
digitalWrite(neg4, LOW);
digitalWrite(neg5, LOW);
digitalWrite(neg6, LOW);
digitalWrite(neg7, HIGH);
digitalWrite(neg8, HIGH);
digitalWrite(neg9, HIGH);
delay(150);
digitalWrite(pos1, LOW);
digitalWrite(pos2, LOW);
digitalWrite(pos3, LOW);
digitalWrite(neg1, LOW);
digitalWrite(neg2, LOW);
digitalWrite(neg3, LOW);
digitalWrite(neg4, HIGH);
digitalWrite(neg5, HIGH);
digitalWrite(neg6, HIGH);
digitalWrite(neg7, LOW);
digitalWrite(neg8, LOW);
digitalWrite(neg9, LOW);
delay(150);
digitalWrite(pos1, LOW);
digitalWrite(pos2, LOW);
digitalWrite(pos3, LOW);
digitalWrite(neg1, HIGH);
digitalWrite(neg2, HIGH);
digitalWrite(neg3, HIGH);
digitalWrite(neg4, LOW);
digitalWrite(neg5, LOW);
digitalWrite(neg6, LOW);
digitalWrite(neg7, LOW);
digitalWrite(neg8, LOW);
digitalWrite(neg9, LOW);
delay(150);
digitalWrite(pos1, LOW);
digitalWrite(pos2, LOW);
digitalWrite(pos3, LOW);
digitalWrite(neg1, LOW);
digitalWrite(neg2, LOW);
digitalWrite(neg3, HIGH);
digitalWrite(neg4, LOW);
digitalWrite(neg5, LOW);
digitalWrite(neg6, HIGH);
digitalWrite(neg7, LOW);
digitalWrite(neg8, LOW);
digitalWrite(neg9, HIGH);
delay(150);
digitalWrite(pos1, LOW);
digitalWrite(pos2, LOW);
digitalWrite(pos3, LOW);
digitalWrite(neg1, LOW);
digitalWrite(neg2, HIGH);
digitalWrite(neg3, LOW);
digitalWrite(neg4, LOW);
digitalWrite(neg5, HIGH);
digitalWrite(neg6, LOW);
digitalWrite(neg7, LOW);
digitalWrite(neg8, HIGH);
digitalWrite(neg9, LOW);
delay(150);
digitalWrite(pos1, LOW);
digitalWrite(pos2, LOW);
digitalWrite(pos3, LOW);
digitalWrite(neg1, HIGH);
digitalWrite(neg2, LOW);
digitalWrite(neg3, LOW);
digitalWrite(neg4, HIGH);
digitalWrite(neg5, LOW);
digitalWrite(neg6, LOW);
digitalWrite(neg7, HIGH);
digitalWrite(neg8, LOW);
digitalWrite(neg9, LOW);
delay(150);
digitalWrite(pos1, LOW);
digitalWrite(pos2, LOW);
digitalWrite(pos3, LOW);
digitalWrite(neg1, HIGH);
digitalWrite(neg2, HIGH);
digitalWrite(neg3, HIGH);
digitalWrite(neg4, LOW);
digitalWrite(neg5, LOW);
digitalWrite(neg6, LOW);
digitalWrite(neg7, LOW);
digitalWrite(neg8, LOW);
digitalWrite(neg9, LOW);
delay(150);
digitalWrite(pos1, LOW);
digitalWrite(pos2, LOW);
digitalWrite(pos3, LOW);
digitalWrite(neg1, LOW);
digitalWrite(neg2, LOW);
digitalWrite(neg3, LOW);
digitalWrite(neg4, HIGH);
digitalWrite(neg5, HIGH);
digitalWrite(neg6, HIGH);
digitalWrite(neg7, LOW);
digitalWrite(neg8, LOW);
digitalWrite(neg9, LOW);
delay(150);
digitalWrite(pos1, LOW);
digitalWrite(pos2, LOW);
digitalWrite(pos3, LOW);
digitalWrite(neg1, LOW);
digitalWrite(neg2, LOW);
digitalWrite(neg3, LOW);
digitalWrite(neg4, LOW);
digitalWrite(neg5, LOW);
digitalWrite(neg6, LOW);
digitalWrite(neg7, HIGH);
digitalWrite(neg8, HIGH);
digitalWrite(neg9, HIGH);
delay(150);
digitalWrite(pos1, LOW);
digitalWrite(pos2, LOW);
digitalWrite(pos3, LOW);
digitalWrite(neg1, HIGH);
digitalWrite(neg2, LOW);
digitalWrite(neg3, LOW);
digitalWrite(neg4, HIGH);
digitalWrite(neg5, LOW);
digitalWrite(neg6, LOW);
digitalWrite(neg7, HIGH);
digitalWrite(neg8, LOW);
digitalWrite(neg9, LOW);
delay(150);
digitalWrite(pos1, LOW);
digitalWrite(pos2, LOW);
digitalWrite(pos3, LOW);
digitalWrite(neg1, LOW);
digitalWrite(neg2, HIGH);
digitalWrite(neg3, LOW);
digitalWrite(neg4, LOW);
digitalWrite(neg5, HIGH);
digitalWrite(neg6, LOW);
digitalWrite(neg7, LOW);
digitalWrite(neg8, HIGH);
digitalWrite(neg9, LOW);
delay(150);
digitalWrite(pos1, LOW);
digitalWrite(pos2, LOW);
digitalWrite(pos3, LOW);
digitalWrite(neg1, LOW);
digitalWrite(neg2, LOW);
digitalWrite(neg3, HIGH);
digitalWrite(neg4, LOW);
digitalWrite(neg5, LOW);
digitalWrite(neg6, HIGH);
digitalWrite(neg7, LOW);
digitalWrite(neg8, LOW);
digitalWrite(neg9, HIGH);
delay(150);
digitalWrite(pos1, LOW);
digitalWrite(pos2, LOW);
digitalWrite(pos3, LOW);
digitalWrite(neg1, LOW);
digitalWrite(neg2, LOW);
digitalWrite(neg3, LOW);
digitalWrite(neg4, LOW);
digitalWrite(neg5, LOW);
digitalWrite(neg6, LOW);
digitalWrite(neg7, HIGH);
digitalWrite(neg8, HIGH);
digitalWrite(neg9, HIGH);
delay(150);
digitalWrite(pos1, LOW);
digitalWrite(pos2, LOW);
digitalWrite(pos3, LOW);
digitalWrite(neg1, LOW);
digitalWrite(neg2, LOW);
digitalWrite(neg3, LOW);
digitalWrite(neg4, HIGH);
digitalWrite(neg5, HIGH);
digitalWrite(neg6, HIGH);
digitalWrite(neg7, LOW);
digitalWrite(neg8, LOW);
digitalWrite(neg9, LOW);
delay(150);
digitalWrite(pos1, LOW);
digitalWrite(pos2, LOW);
digitalWrite(pos3, LOW);
digitalWrite(neg1, HIGH);
digitalWrite(neg2, HIGH);
digitalWrite(neg3, HIGH);
digitalWrite(neg4, LOW);
digitalWrite(neg5, LOW);
digitalWrite(neg6, LOW);
digitalWrite(neg7, LOW);
digitalWrite(neg8, LOW);
digitalWrite(neg9, LOW);
delay(150);
digitalWrite(pos1, LOW);
digitalWrite(pos2, LOW);
digitalWrite(pos3, LOW);
digitalWrite(neg1, LOW);
digitalWrite(neg2, LOW);
digitalWrite(neg3, HIGH);
digitalWrite(neg4, LOW);
digitalWrite(neg5, LOW);
digitalWrite(neg6, HIGH);
digitalWrite(neg7, LOW);
digitalWrite(neg8, LOW);
digitalWrite(neg9, HIGH);
delay(150);
digitalWrite(pos1, LOW);
digitalWrite(pos2, LOW);
digitalWrite(pos3, LOW);
digitalWrite(neg1, LOW);
digitalWrite(neg2, HIGH);
digitalWrite(neg3, LOW);
digitalWrite(neg4, LOW);
digitalWrite(neg5, HIGH);
digitalWrite(neg6, LOW);
digitalWrite(neg7, LOW);
digitalWrite(neg8, HIGH);
digitalWrite(neg9, LOW);
delay(150);
digitalWrite(pos1, LOW);
digitalWrite(pos2, LOW);
digitalWrite(pos3, LOW);
digitalWrite(neg1, HIGH);
digitalWrite(neg2, LOW);
digitalWrite(neg3, LOW);
digitalWrite(neg4, HIGH);
digitalWrite(neg5, LOW);
digitalWrite(neg6, LOW);
digitalWrite(neg7, HIGH);
digitalWrite(neg8, LOW);
digitalWrite(neg9, LOW);
delay(150);
}
}