A Bitcoin Price Tracker using ESP32 is a simple electronic project that uses an ESP32 microcontroller board to get the real time Bitcoin price data from an online API provider of coinex exchange and display it on an I2C LCD screen. The ESP32 has built in Wi-Fi option that connects to the internet and retrieves the latest data of specific cryptocurrency prices.
Introduction
The connected LEDs can be used as visual indicators to signal price fluctuations, such as turning red for a drop and green for a rise of the price. This circuit is simple, compact, and works in low power to monitor Bitcoin prices without needing a computer or smartphone.
This tracker is particularly useful for cryptocurrency traders, enthusiasts or anyone who wants a quick analysis of market trends. By using an ESP32 the entire circuit is low cost and power efficient, making it ideal for continuous operation. Whether mounted on a desk, integrated into a smart home system or you can used in a public display. This Bitcoin Price Tracker offers a practical solution for staying updated on cryptocurrency prices. Let’s build this.
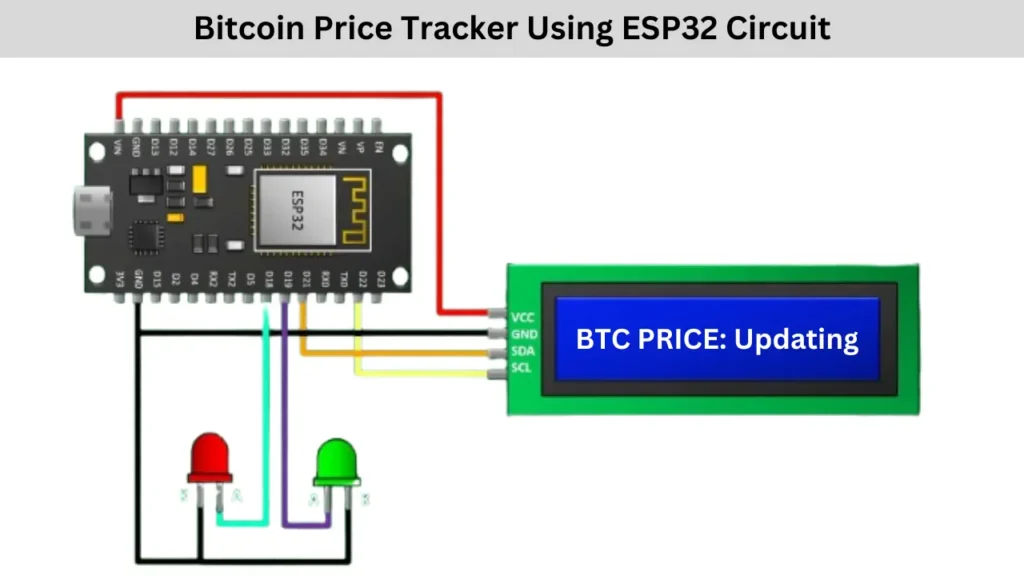
Bitcoin Price Tracker Using ESP32 Circuit Diagram
Components Required
| Component | Quantity |
|---|---|
| ESP32 Development Board | 1 |
| I2C 16×2 LCD Display | 1 |
| Red LED | 1 |
| Green LED | 1 |
| Resistors (220Ω) | 2 |
| Jumper Wires | As needed |
| Breadboard (Optional) | 1 |
Connection
The ESP32 board is connected to the I2C 16×2 LCD display using two wires and which connect with SDA to D21 and SCL to D22 of ESP32 for data communication. The VCC (3.3V or 5V) and GND for power are also connected. The red and green LEDs are connected to digital GPIO pins (e.g., D18 for the red LED and D19 for the green LED).
Connecting resistor is optional and gives additional protection for the LED. The LED anodes are connected through 220Ω resistors to limit current and their cathodes are connected to GND. The ESP32 is powered via its USB port or an external power source. This setup will fetch the Bitcoin price data from the internet and display it on the LCD while using LEDs to indicate price fluctuations.
Programming Code
#include <LiquidCrystal_I2C.h>
#include <WiFi.h>
#include <Wire.h>
#include <HTTPClient.h>
#include <NTPClient.h>
#include <WiFiUdp.h>
#include <ArduinoJson.h>

LiquidCrystal_I2C lcd(0x27,16,2);

#define upLED 18
#define downLED 19

const char* ssid = "your ssid here";
const char* password = "your ssid password here";

const int httpsPort = 443;
const String url = "http://api.coindesk.com/v1/bpi/currentprice/BTC.json";
const String historyURL = "http://api.coindesk.com/v1/bpi/historical/close.json";
const String cryptoCode = "BTC";

WiFiClient client;
HTTPClient http;

String formattedDate;
String dayStamp;
String timeStamp;

void setup()
{
  lcd.init();
  lcd.clear();
  lcd.backlight();

  Serial.begin(115200);

  pinMode(upLED, OUTPUT);
  pinMode(downLED, OUTPUT);

  WiFi.begin(ssid, password);
}

void loop()
{

  http.begin(url);
  int httpCode = http.GET();
  StaticJsonDocument<2000> doc;
  DeserializationError error = deserializeJson(doc, http.getString());

  String BTCUSDPrice = doc["bpi"]["USD"]["rate_float"].as<String>();
  String lastUpdated = doc["time"]["updated"].as<String>();
  http.end();

  StaticJsonDocument<2000> historyDoc;
  http.begin(historyURL);
  int historyHttpCode = http.GET();
  DeserializationError historyError = deserializeJson(historyDoc, http.getString());

  JsonObject bpi = historyDoc["bpi"].as<JsonObject>();
  double yesterdayPrice;
  for (JsonPair kv : bpi) {
    yesterdayPrice = kv.value().as<double>();
  }

  bool isUp = BTCUSDPrice.toDouble() > yesterdayPrice;
  double percentChange;
  String dayChangeString = "24hr Change:";
  if (isUp)
  {
    percentChange = ((BTCUSDPrice.toDouble() - yesterdayPrice) / yesterdayPrice) * 100;
    digitalWrite(upLED, HIGH);
    digitalWrite(downLED, LOW);
  }
  else
  {
    percentChange = ((yesterdayPrice - BTCUSDPrice.toDouble()) / yesterdayPrice) * 100;
    dayChangeString = dayChangeString + "-";
    digitalWrite(downLED, HIGH);
    digitalWrite(upLED, LOW);
  }

  lcd.setCursor(4,0);
  lcd.print("BTC RATE:");
  lcd.setCursor(3,1);
  lcd.print(BTCUSDPrice);
  lcd.setCursor(13,1);
  lcd.print("$");

  http.end();
  esp_sleep_enable_timer_wakeup(900000000);
}
Note: Update the code with your wifi Username and password to get connect with internet.