In this article I’m going to explain the detailed about the keypad door lock using arduino UNO. You can only access the door by entering the exact password. The microcontroller on the board is ATmega328p.
Arduino UNO
The Arduino – is a hardware and software company. Arduino UNO is a microcontroller-based electronics board. this microcontroller working based on the code we are going to install.
How to make a keypad door lock
To make the keypad based door lock you need some electronic components and board. the items you need.
- Arduino UNO board
- 16*2 LCD display
- 4*3 keypad
- Piezo buzzer
- wires
- Servo motor
Connection and Code Explanation
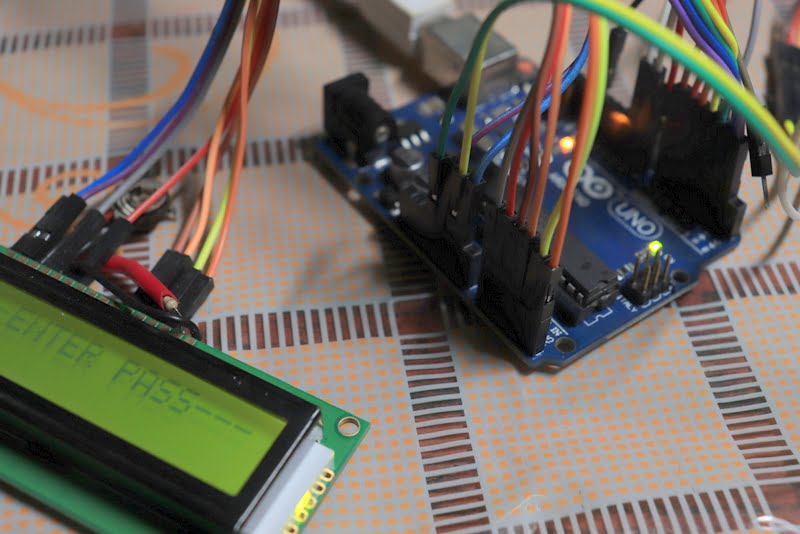
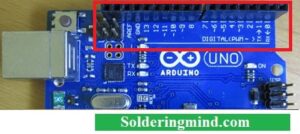
Connect the 16*2 display on analog pins from ( A0, A1, A2, A3, A4, A5, ) on Arduino. ( I just giving the code for the better understanding full code will available at the bottom of this post )

#include <Servo.h>

Servo myservo;

LiquidCrystal lcd(A0, A1, A2, A3, A4, A5);

#define Password_Lenght 7 // Give enough room for six chars + NULL char

int pos = 0;    // variable to store the servo motor position
Next, you need to connect the 4*3 keypad to the Arduino. 4*3 means 4 rows and 3 columns. so connect the keypad row pins to Arduino pin (1,2,3,4) and connect the columns pin to Arduino ( 5,6,7 )
const byte ROWS = 4;
const byte COLS = 3;
char keys[ROWS][COLS] = {
  {'1', '2', '3'},
  {'4', '5', '6'},
  {'7', '8', '9'},
  {'*', '0', '#'}
};
bool door = true;

byte rowPins[ROWS] = {1, 2, 3, 4}; //connect to the row pinouts of the keypad
byte colPins[COLS] = {5, 6, 7}; //connect to the column pinouts of the keypad
then the last connect the piezo buzzer and servo motor to the Arduino. Connect servo pin on Arduino pin 9 and piezo buzzer pin on Arduino pin 8
int buzz=8;
int invalidcount=4;
void setup()
{
  pinMode(buzz, OUTPUT);
  myservo.attach(9);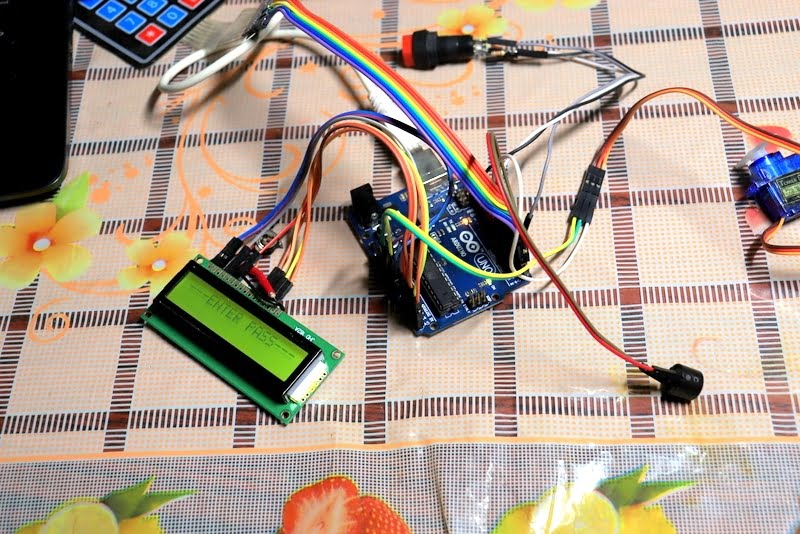
The complete code of Arduino based Door lock
#include <Keypad.h>
#include <LiquidCrystal.h>
#include <Servo.h>

Servo myservo;

LiquidCrystal lcd(A0, A1, A2, A3, A4, A5);

#define Password_Lenght 7 // Give enough room for six chars + NULL char

int pos = 0;    // variable to store the servo position

char Data[Password_Lenght]; // 6 is the number of chars it can hold + the null char = 7
char Master[Password_Lenght] = "123456";
byte data_count = 0, master_count = 0;
bool Pass_is_good;
char customKey;


const byte ROWS = 4;
const byte COLS = 3;
char keys[ROWS][COLS] = {
  {'1', '2', '3'},
  {'4', '5', '6'},
  {'7', '8', '9'},
  {'*', '0', '#'}
};
bool door = true;

byte rowPins[ROWS] = {1, 2, 3, 4}; //connect to the row pinouts of the keypad
byte colPins[COLS] = {5, 6, 7}; //connect to the column pinouts of the keypad

Keypad customKeypad( makeKeymap(keys), rowPins, colPins, ROWS, COLS); //initialize an instance of class NewKeypad
int buzz=8;
int invalidcount=4;
void setup()
{
  pinMode(buzz, OUTPUT);
  myservo.attach(9);
  ServoClose();
  lcd.begin(16, 2);
  lcd.print("    WELC0ME  ");
  lcd.setCursor(0, 1);
  lcd.print("   H0ME  ");
  delay(3000);
  lcd.clear();

}


void loop()
{
  if (door == 0)
  {
   delay(5000);

    {
      lcd.clear();
      ServoClose();
      lcd.print("  D00R IS CL0SED ");
      delay(3000);
      digitalWrite(buzz, HIGH);
      delay(1000);
      digitalWrite(buzz,LOW);

      door = 1;
    }
  }

  else Open();

}


void clearData()
{
  while (data_count != 0)
  { // it be used for any array size,
    Data[data_count--] = 0; //clear array for new data
  }
  return;
}


void ServoOpen()
{
  for (pos = 180; pos >= 0; pos -= 5) { // goes from 0 degrees to 180 degrees
    // in steps of 1 degree
    myservo.write(pos);              // servo to go to position in variable 'pos'
    delay(15);                       // waits 15ms for the servo to reach the position
  }
}

void ServoClose()
{
  for (pos = 0; pos <= 180; pos += 5) { // goes from 180 degrees to 0 degrees
    myservo.write(pos);              // tell servo to go to position in variable 'pos'
    delay(15);                       // waits 15ms for the servo to reach the pos
  }
}


void Open()
{
  lcd.setCursor(0, 0);
  lcd.print("---ENTER PASS---");
lcd.setCursor(7,1);
lcd.print(" ");
lcd.setCursor(0,1);


  customKey = customKeypad.getKey();
  if (customKey) // makes sure a key is actually pressed, equal to (customKey != NO_KEY)
  {
    Data[data_count] = customKey; // store char into data array
    lcd.setCursor(data_count, 1); // move cursor to show each new char
    lcd.print("*"); // print char at said cursor
    data_count++; // increment data array by 1 to store new char, also keep track of the number of chars entered
  }


  if (data_count == Password_Lenght - 1) // if the array index is equal to the number of expected chars, compare data to master
  {
    if (!strcmp(Data, Master)) // equal to (strcmp(Data, Master) == 0)
    {
      lcd.clear();
      ServoOpen();
      lcd.print("  D00R IS 0PEN ");
      digitalWrite(buzz, HIGH);
delay(80);
digitalWrite(buzz, LOW);
delay(80);
digitalWrite(buzz, HIGH);
delay(80);
digitalWrite(buzz, LOW);
delay(200);
digitalWrite(buzz, HIGH);
delay(80);
digitalWrite(buzz, LOW);
delay(80);
digitalWrite(buzz, HIGH);
delay(80);
digitalWrite(buzz, LOW);
delay(80);
      door = 0;
    }
    else
    {

      lcd.clear();
lcd.setCursor(1,0);
lcd.print("C0DE");
lcd.setCursor(6,0);
lcd.print("INC0RRECT");
      delay(1000);
      digitalWrite(buzz, HIGH);
      delay(5000);
      digitalWrite(buzz,LOW);


      door = 1;

    }

    clearData();
  }
}
Connect your Arduino UNO to computer or laptop and copy the code and paste it on the Arduino software and burn it on the Arduino board then you are done. The default passcode is 1234, you can change it as your convenience.
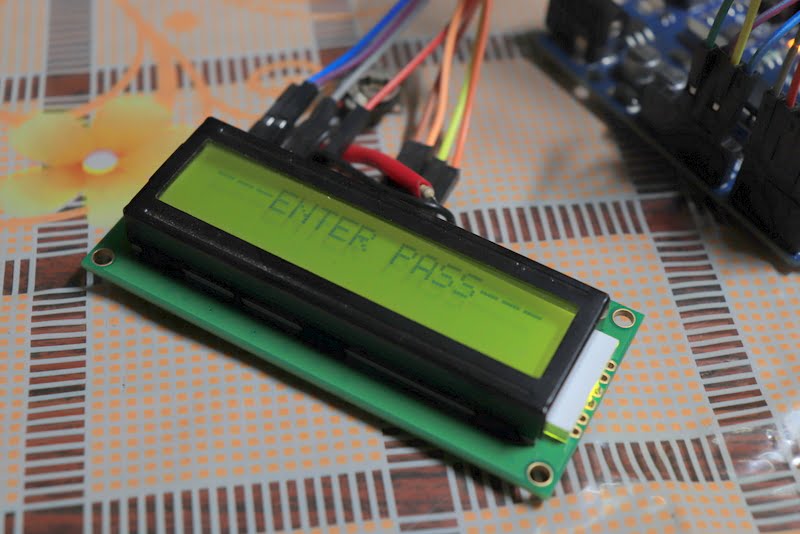
connect the power to the board and ( check all the connections are proper ) then the display gets on and it shows enter the password. then press the right password you are( given on your code). now its shows door open.
suppose the code you entered is wrong you get an error message along with beep sound. 4 invalid entry of password will give you long time beep sound.


Good work indeed. Am a consistent reader of your articles.
I was asking wether you can design a code and circuit diagram of an egg incubator based on Arduino uno. (Microcontroller being 328p)