Introduction
The ESP32-CAM is a low-cost module that combines the ESP32 microcontroller with a camera and wireless connectivity (Wi-Fi and Bluetooth). It is designed for a wide range of applications, including wireless cameras, security cameras, machine vision, home automation, and robotics.
Also Check: esp32 cam pir motion detector with photo capture
The ESP32-CAM has a small form factor, making it easy to integrate into a variety of projects, and it is also low-power, making it suitable for battery-powered applications.
The camera module of the ESP32-CAM is a small 2MP camera that can capture still images and video, and the module can be controlled through an API that allows it to adjust the camera settings and capture images. With built-in Wi-Fi and Bluetooth, the ESP32-CAM can be easily connected to a network and can send data wirelessly.
In this article, we will be providing a beginner-friendly introduction to the ESP32-CAM module, including information on its features, how to set it up, and some simple code examples for getting started.
With the help of this article, you will be able to start experimenting with the ESP32-CAM and explore its capabilities, and hopefully, you will find it fun and interesting.
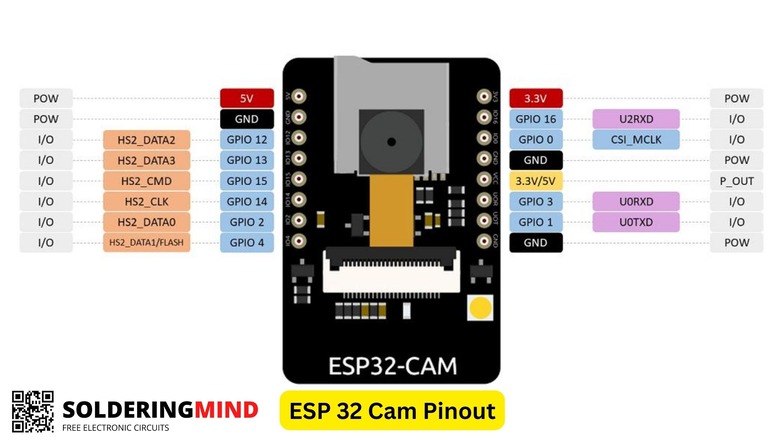
ESP32 Cam Board Pinout
Here is the pinout for the ESP32-CAM:
Hardware Setup
Hardware setup for the ESP32-CAM involves assembling the module, connecting the camera, and any necessary peripherals. Here is a general guide for the hardware setup:
- Assemble the ESP32-CAM module: The ESP32-CAM module typically comes with the ESP32 microcontroller, camera module, and a PCB board. The camera module is usually connected to the PCB board using a ribbon cable. Make sure the camera module is securely connected to the PCB board.
- Connect the module to power: The ESP32-CAM module can be powered through the micro-USB port on the PCB board. Connect the module to a power source, such as a computer or a USB power adapter.
- Connect the module to a programmer: The ESP32-CAM module needs to be programmed with firmware before it can be used. To program the module, you will need a programmer, such as an FTDI programmer or a USB-to-Serial converter. Connect the programmer to the ESP32-CAM module according to the instructions provided with the programmer.
- Optional peripherals: Depending on your project, you may need to connect additional peripherals to the ESP32-CAM module. For example, if you are using the module to control a motor or other actuator, you will need to connect it to the appropriate pins on the module.
It’s important to make sure the connections are correct and secure before applying power to the module. You can refer to the ESP32-CAM documentation or the manufacturer’s instructions for more detailed instructions on the hardware setup.
Once the hardware setup is completed, you can proceed to the software setup, where you will install the necessary software and libraries for programming the ESP32-CAM, including information on how to set up the development environment.
Software Setup
Software setup for the ESP32-CAM involves installing the necessary software and libraries for programming the module. Here is a general guide for the software setup:
- Install the ESP-IDF: The ESP-IDF (Espressif IoT Development Framework) is a software development kit for the ESP32 microcontroller. It includes the toolchain, libraries, and examples needed to develop applications for the ESP32. You can download the latest version of ESP-IDF from the Espressif website.
- Configure the ESP-IDF: After installing the ESP-IDF, you will need to configure it to work with the ESP32-CAM module. This involves setting the serial port and board configuration. You can refer to the ESP-IDF documentation for detailed instructions on how to configure the ESP-IDF.
- Install the camera library: The ESP32-CAM module includes a camera library that provides an API for controlling the camera and capturing images. The library can be downloaded from the Espressif GitHub repository.
- Install the Arduino IDE: The Arduino IDE (Integrated Development Environment) is a popular development environment for the ESP32. It can be used to write and upload code to the ESP32-CAM module. You can download the latest version of Arduino IDE from the Arduino website.
- Install the ESP32 Board Package: The ESP32 Board Package contains the necessary files to support the ESP32 microcontroller in the Arduino IDE. You can install the package by going to the Arduino IDE preferences, pasting the link https://dl.espressif.com/dl/package_esp32_index.json and pressing OK.
- Install the ESP32-CAM board package: The ESP32-CAM board package contains the necessary files to support the ESP32-CAM module in the Arduino IDE. You can install the package by going to the Arduino IDE Board Manager searching for “ESP32-CAM” and pressing install.
Once you have completed the software setup, you can start writing and uploading code to the ESP32-CAM module.
Connecting to WiFi
Connecting the ESP32-CAM to a Wi-Fi network is an important step to use its wireless capabilities. Here is a general guide for connecting the ESP32-CAM to a Wi-Fi network:
- Upload the Wi-Fi configuration code: Before the ESP32-CAM can connect to a Wi-Fi network, you will need to upload a code to the module that contains the Wi-Fi network credentials (SSID and password). This code can be uploaded using the Arduino IDE or the ESP-IDF.
- Enter the Wi-Fi credentials: Once the code is uploaded, open the Serial Monitor in the Arduino IDE, and enter the Wi-Fi credentials (SSID and password) when prompted. Make sure to set the baud rate in the Serial Monitor to match the baud rate used in the code.
- Verify the connection: Once the Wi-Fi credentials are entered, the ESP32-CAM will attempt to connect to the Wi-Fi network. You can verify the connection by checking the ESP32-CAM’s IP address. In the Serial Monitor, you will see the IP address assigned to the ESP32-CAM by the router.
- Connecting to a different network: To connect to a different network, you will need to upload a new code with the new Wi-Fi credentials and repeat the process.
It’s important to note that the ESP32-CAM module will not connect to a network until the correct credentials are entered. Also, you should make sure that your router and wifi network are configured to allow the ESP32-CAM to connect.
Additionally, if you want to use the ESP32-CAM in a different place, you can connect to the wifi network via its web interface. There are some libraries like ESPAsyncWebServer and ESPAsyncTCP that you can use for this purpose, and also you can use the Arduino IDE to set up the web interface and the wifi credentials.
Basic Code Example
Here is a basic code example for capturing an image using the ESP32-CAM:
#include <esp_camera.h>

void setup() {
  // Initialize the camera
  camera_config_t config;
  config.ledc_channel = LEDC_CHANNEL_0;
  config.ledc_timer = LEDC_TIMER_0;
  config.pin_d0 = Y2_GPIO_NUM;
  config.pin_d1 = Y3_GPIO_NUM;
  config.pin_d2 = Y4_GPIO_NUM;
  config.pin_d3 = Y5_GPIO_NUM;
  config.pin_d4 = Y6_GPIO_NUM;
  config.pin_d5 = Y7_GPIO_NUM;
  config.pin_d6 = Y8_GPIO_NUM;
  config.pin_d7 = Y9_GPIO_NUM;
  config.pin_xclk = XCLK_GPIO_NUM;
  config.pin_pclk = PCLK_GPIO_NUM;
  config.pin_vsync = VSYNC_GPIO_NUM;
  config.pin_href = HREF_GPIO_NUM;
  config.pin_sscb_sda = SIOD_GPIO_NUM;
  config.pin_sscb_scl = SIOC_GPIO_NUM;
  config.pin_pwdn = PWDN_GPIO_NUM;
  config.pin_reset = RESET_GPIO_NUM;
  config.xclk_freq_hz = 20000000;
  config.pixel_format = PIXFORMAT_JPEG;
  //init with high specs to pre-allocate larger buffers
  if(psramFound()){
    config.frame_size = FRAMESIZE_UXGA;
    config.jpeg_quality = 10;
    config.fb_count = 2;
  } else {
    config.frame_size = FRAMESIZE_SVGA;
    config.jpeg_quality = 12;
    config.fb_count = 1;
  }
  // camera init
  esp_err_t err = esp_camera_init(&config);
  if (err != ESP_OK) {
    Serial.printf("Camera init failed with error 0x%x", err);
    return;
  }
}

void loop() {
  // Capture an image
  camera_fb_t* fb = esp_camera_fb_get();
  if(!fb) {
    Serial.println("Camera capture failed");
    return;
  }

  // Do something with the captured image
  // For example, save it to the SD card
  save_to_sd(fb->buf, fb->len);

  // Release the captured image
  esp_camera_fb_return(fb);
}
This code uses the ESP-IDF and the camera library to initialize the camera and capture an image.
The setup() function configures the camera with the appropriate settings such as the frame size, pixel format, and pin assignments.
The loop() function captures an image using the esp_camera_fb_get() function, which returns
Troubleshooting ESP32 Cam Board
Here are some common issues you may encounter when working with the ESP32-CAM and some possible solutions:
- Camera not working: Make sure that the camera is connected properly to the ESP32 and that the pin assignments are correct. Check that the power supply is providing enough voltage and current to the ESP32 and the camera.
- Camera not connecting to WiFi: Check that the WiFi credentials are correct and that the ESP32 is within range of the WiFi network. Make sure that the WiFi library is configured correctly and that the ESP32 is configured as a station.
- Camera not capturing images: Make sure that the camera is initialized correctly and that the correct resolution and pixel format are set. Check that the camera is not in sleep mode and that the power supply is providing enough voltage and current to the ESP32 and the camera.
- Images are distorted or of poor quality: Make sure that the lens is clean and that the focus is set correctly. Check that the correct resolution and pixel format are set and that the camera is not in sleep mode.
- The camera is freezing or crashing: Make sure that you are using the latest version of the ESP-IDF and the camera library. Check that the program is not using too much memory or too many resources. Try increasing the size of the camera buffer.
If these solutions do not work, check the ESP32-CAM documentation and forums for more information or consult with the manufacturer.
Conclusion
In conclusion, the ESP32-CAM is a powerful and versatile camera module that can be easily integrated into a variety of projects. Its small form factor, low power consumption, and ability to connect to WiFi make it an ideal choice for IoT applications.
By following the steps outlined in this article, you should be able to set up and use the ESP32-CAM with minimal difficulty. However, if you encounter any issues, there are a number of troubleshooting tips and resources available to help you resolve them. With the ESP32-CAM, you can add image and video capture capabilities to your projects and open up a whole new world of possibilities.