A microwave radar sensor is an electronic device that uses microwave radiation to detect and measure the distance, velocity, and other characteristics of objects in its field of view. It works by emitting short bursts of microwave energy and then detecting the reflections of that energy that bounce back from objects in its path.
Microwave radar sensors are commonly used in a wide variety of applications, including automotive collision avoidance systems, traffic control systems, military and defense applications, weather forecasting, and remote sensing of the earth’s surface.
Some common types of microwave radar sensors include continuous wave radar, pulsed radar, and frequency-modulated continuous wave (FMCW) radar. Each type has its own unique set of advantages and disadvantages, depending on the specific application.
Overall, microwave radar sensors are a highly effective and reliable means of detecting and measuring objects in a variety of environments and conditions.
Working
Microwave radar sensors work by emitting short bursts of microwave energy and then detecting the reflections of that energy that bounce back from objects in their path.
The sensor emits a microwave signal from an antenna, which travels through the air until it encounters an object in its path. When the signal hits an object, some of the energy is reflected back towards the sensor.
The sensor then measures the time it takes for the signal to travel to the object and back and uses this information to calculate the distance to the object. By emitting and receiving multiple bursts of energy, the sensor can also detect the movement of objects and measure their velocity.
In addition to distance and velocity, microwave radar sensors can also provide information about the size, shape, and composition of objects in their field of view. This information can be used to identify and classify different types of objects, such as cars, people, or animals.
Overall, the working principle of microwave radar sensors is based on the reflection of microwave energy, which allows the sensor to detect and measure the characteristics of objects in its path.
Interfacing RCWL-0516 Radar Sensor with Arduino
To program an Arduino for motion detection using the RCWL-0516 sensor, you can follow these steps:
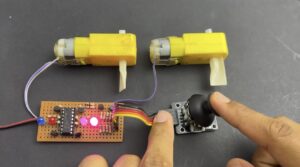
- Connect the RCWL-0516 sensor to your Arduino board. The sensor has three pins: VCC, GND, and OUT. Connect VCC to 5V, GND to GND, and OUT to a digital pin on your Arduino board (e.g. pin 2).
- Open the Arduino IDE and create a new sketch. Start by defining the pin number where you connected the OUT pin of the sensor:
Programming Arduino for Motion Detection using RCWL-0516 Sensor
int sensorPin = 2;3. In the setup() function, initialize the serial communication:
void setup() {
  Serial.begin(9600);
}
4. In the loop() function, read the sensor value and print it to the serial monitor:
void loop() {
  int sensorValue = digitalRead(sensorPin);
  Serial.println(sensorValue);
  delay(500);
}- Upload the sketch to your Arduino board and open the serial monitor. You should see a stream of values printed to the monitor.
- Move your hand or another object in front of the sensor and observe the changes in the sensor value. The sensor should output a “1” when it detects motion and a “0” when there is no motion.
- You can now use the sensor value to trigger other actions in your Arduino code, such as turning on an LED or playing a sound.
Here’s an example code that turns on an LED when motion is detected:
int sensorPin = 2;
int ledPin = 3;

void setup() {
  Serial.begin(9600);
  pinMode(ledPin, OUTPUT);
}

void loop() {
  int sensorValue = digitalRead(sensorPin);
  Serial.println(sensorValue);
  if (sensorValue == HIGH) {
    digitalWrite(ledPin, HIGH);
  } else {
    digitalWrite(ledPin, LOW);
  }
  delay(500);
}
In this code, we’ve added a new variable ledPin to represent the pin where the LED is connected. In the setup() function, we’ve initialized the LED pin as an output.