Build a cellphone charger using bike battery – Worried about charging your mobile phone while traveling here is the solution to resolve this issue. In this article, I am going to explain the charger circuit for charging your mobile phones.
Most of the bike mobile charger is based on LM 7805 regulator IC. The demerits of using this kind of circuits are, you need to connect your mobile phone with this circuit for a long time for getting fully charged.
Because of the LM 7805, 5-volt voltage regulator, IC will provide up to 800 milliamperes. These days the new model cell phones will be having the battery capacity of 3000 to 4000 Mah.
Motorcycle cellphone charger PCB layout
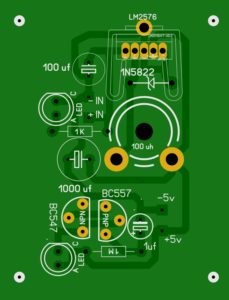
So using this kind of simple circuit will take a longer time to full charge. so I decided to develop a fast charging circuit for your motorcycle and car.
The circuit will provide 5 volts 3-ampere continuous power supply which will allow fast charging of your mobile phones. 1 minute is required for level up 1 percentage in your phones.
The circuit is based on the new modern ic the voltage regulator IC of LM 2576. Which is having lots of benefits That are:-
- High input voltage in between 40-50v DC.
- The current output of 3 amperes.
- minimum components are needed to get the power supply.
- Low cost.
- Easy to build.
- Circuit friendly for beginners.
- Adjustable setup and feedback input.
- the price of this IC is around 60 – 100 rupees.
In this bike mobile charger circuit, I included a LED flasher as an indicator of mobile charging when you plug in the charger the indicator starts to blink it will show to the mobile is being to start charging. You can also check LM2567 variable voltage and current circuit with PCB layout
Cellphone charger using bike battery circuit diagram
The circuit please working based on the LM 2567 voltage regulator IC and the connected components. Connected components of capacitor, resistor, inductor, and diode.
On number one connecting a 100 MF capacitor. On pin number 2 this is the main output pin of this IC. Can connect the PIN number do with a 100 uh inductor. and the conductor will connect to the fourth pin of the IC. the pin 4 of IC is the difference pin. when directly connecting the reference into the output pin will provide the constant voltage of 5 volts with 3 amperes.
When connecting 4 th pin with preset pot through the ground pin will allow you to adjust the voltage range from 1.23 volt to 40 v.
After that, the output pin goes through the capacitor of 1000 MF for the filtering purpose.
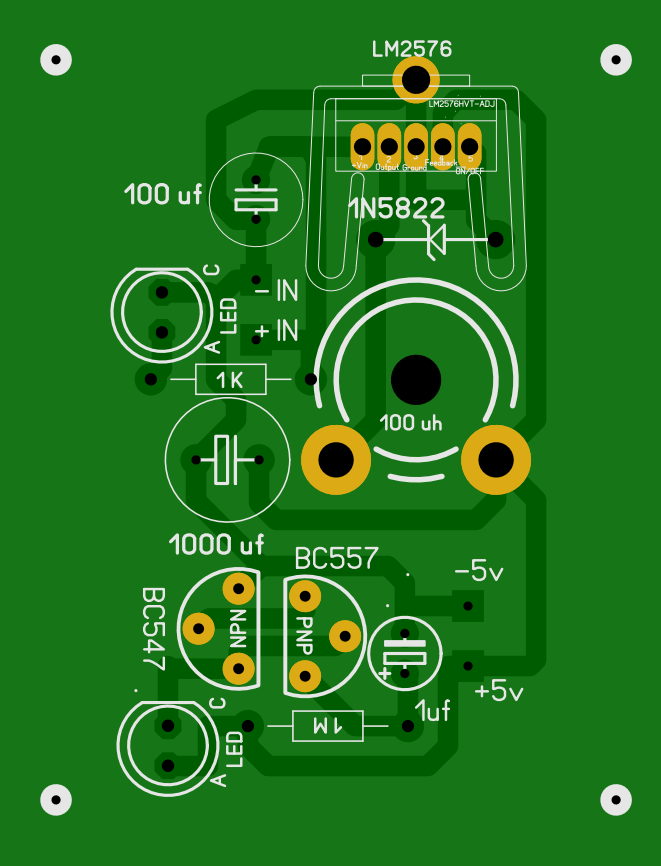
PCB layout of bike mobile charger
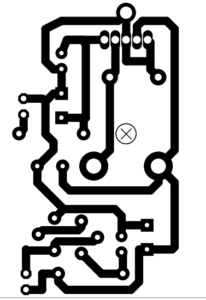
The circuit also consists a LED blinking or LED indicator which provide you the indication of charging.
This LED indicator circuit is based on two transistors. One NPN and one PNP transistor are included in the circuit. The NPN transistor is bc 547 and the PNP transistor is bc 557. That are connected to each other with few components. A 1m oh resistor connect in the base of the PNP transistor and the 1 uf capacitor. When applying the voltage does circuit gets start to work ok and LED is going to start blinking.
Most of the peoples buying the Tamil mobile charger with high cost. That’s happening due to the lack of knowledge. In this article will help you to build a bike mobile charger easily.
You will never get this type of circuits from anywhere. The purchased motorcycle cellPhone charger will not provide that much efficiency. You will only get the power output of 5 v with 1 A.
How to install the motorcycle cell phone charger to your bicycle
The board consists of the input and output voltage section. from the input voltage section 1 the positive and the negative connections and you need to connect this positive to the bike battery positive wire and negative to the body of the motorcycle. ( You can also connect through the switch ).
Voltage output wires connect a USB port. And security enclosed with cabinet. Then place the cabinet near to the accessible area in your motorcycle.
After the proper connections are done the LED starting to blink. Now the project is ready you can start to charge your mobile phones. Have a nice day.


Hi
hi
Sir/madam
This is sudhakar
How can i get pcb boards and I need the intalation of components of the board video design bike charger can u please send me the videos link to my mail id:[email protected] or can i get a link message to my phone no:8978793773