Introduction to raspberry pi
The Raspberry Pi is a low-cost, credit-card sized computer that plugs into a computer monitor or TV, and uses a standard keyboard and mouse. It is a capable little device that enables people of all ages to explore computing, and to learn how to program in languages like Scratch and Python. The Raspberry Pi is developed and maintained by the Raspberry Pi Foundation, a UK-based charity that aims to promote the study of computer science and related topics, especially at school level.
A Raspberry Pi is a small, single-board computer that includes the following main components:
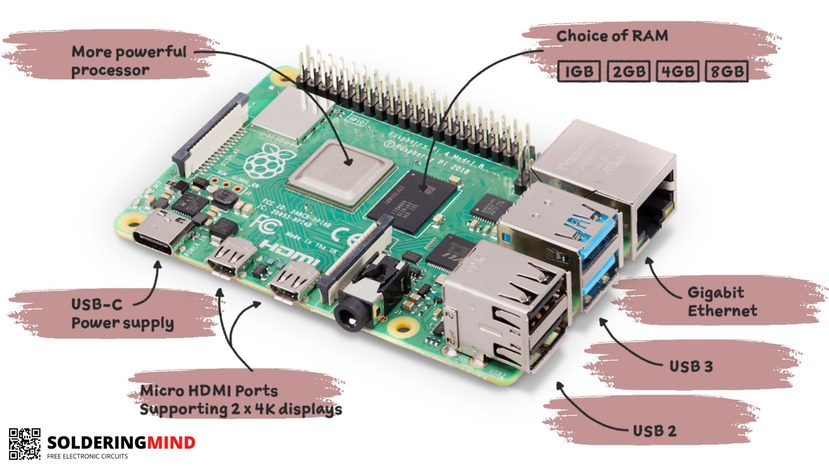
- CPU (Central Processing Unit): This is the brain of the Raspberry Pi, responsible for executing instructions and performing calculations.
- RAM (Random Access Memory): This is the memory that the CPU uses to temporarily store data while it is being processed.
- GPU (Graphics Processing Unit): This is responsible for handling the graphics processing tasks of the Raspberry Pi.
- USB ports: These are used to connect various peripherals such as keyboard, mouse, and storage devices.
- Ethernet port: This is used to connect the Raspberry Pi to a wired network.
- HDMI port: This is used to connect the Raspberry Pi to a display.
- Audio jack: This is used to output audio from the Raspberry Pi.
- Micro-USB port: This is used to connect the Raspberry Pi to a power supply.
- Micro SD card slot: This is used to store the operating system and data for the Raspberry Pi.
- General Purpose Input/Output (GPIO) pins: These are used to connect the Raspberry Pi to other devices and sensors.
- Camera Serial Interface (CSI) and Display Serial Interface (DSI) ports: These are used to connect camera and display module respectively.
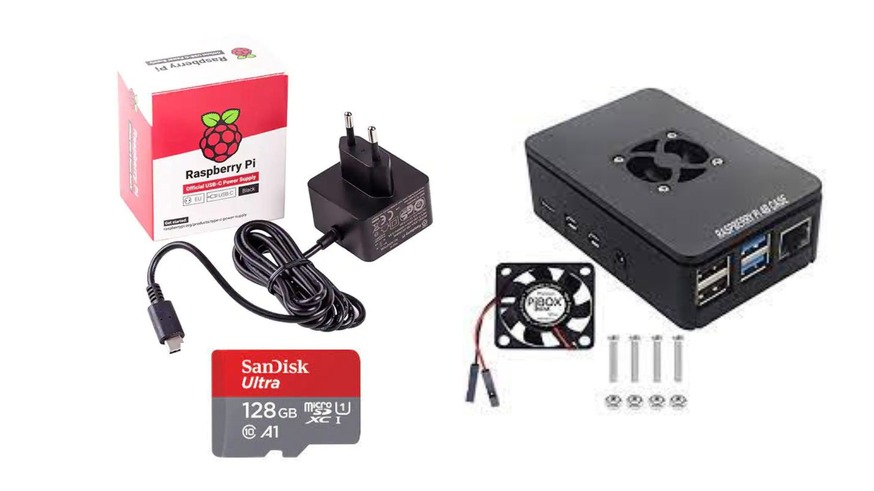
A typical Raspberry Pi setup includes a Raspberry Pi board, a power supply, a micro SD card, a keyboard, a mouse, and a display.
Types:
There are several models of the Raspberry Pi, each with different features and capabilities. The most recent models are:
- Raspberry Pi 4 Model B: The latest and most powerful model, with up to 8GB of RAM, dual-display support, and Gigabit Ethernet.
- Raspberry Pi 400: A compact keyboard with a built-in Raspberry Pi 4.
- Raspberry Pi 3 Model A+ : A smaller, cheaper version of the Raspberry Pi 3 Model B+, with 512MB of RAM and no Ethernet port.
- Raspberry Pi 3 Model B+: The previous generation model, with 1GB of RAM, Gigabit Ethernet, and improved power management.
The Raspberry Pi can be used for a wide range of applications, from simple projects like setting up a media center or retro gaming console, to more complex projects like building robots or creating a home automation system. It can also be used as a low-cost desktop computer or as a platform for learning to code and programming.
The Raspberry Pi is compatible with a wide range of operating systems, including the official Raspberry Pi OS (previously known as Raspbian), as well as other Linux distributions, and even Windows 10 IoT. And with the low-cost it is becoming increasingly popular with students, educators, hobbyists, and makers around the world.
Setting up the Hardware:
Setting up the hardware for your Raspberry Pi involves assembling the various components and connecting them to the board. Here are the basic steps you should follow:
- Start by unboxing your Raspberry Pi board and any other components you have purchased (such as a power supply or case).
- Insert the microSD card into the slot on the bottom of the Raspberry Pi board. Make sure it is inserted with the correct orientation and pushed in firmly.
- Connect the keyboard, mouse, and monitor to the Raspberry Pi using the appropriate cables. The Raspberry Pi uses standard USB and HDMI connectors, so most modern peripherals should work.
- Connect the power supply to the Raspberry Pi. The power supply should have a USB-C connector that plugs into the Raspberry Pi board.
- Turn on the monitor and power on the Raspberry Pi by connecting the power supply. The Raspberry Pi should boot up and display the initial setup screen.
- If you wish to use a case for the raspberry pi, you can now fit the raspberry pi board in it and then close the case.
Note: If you are using a Raspberry Pi 4 Model B, it is recommended to use a power supply with a minimum of 3A to ensure stable performance. And also it’s good to use a fan to avoid overheating.
Once you have completed these steps, your Raspberry Pi should be set up and ready to use. You can now proceed to install the operating system and configure your system settings.
Installing the Operating System
Installing an operating system on your Raspberry Pi is a relatively simple process. There are several ways to do this, but the most common method is to use a program called NOOBS (New Out of Box Software). Here’s a basic overview of the process:
- Download the NOOBS software from the official Raspberry Pi website. You can choose either the offline or online version of NOOBS.
- Format your microSD card. You can do this using software such as SD Formatter for Windows or Disk Utility for Mac. Make sure to choose the “FAT32” file system.
- Extract the contents of the NOOBS zip file to the root directory of the microSD card. Make sure the files are copied directly to the card and not inside a folder.
- Insert the microSD card into the Raspberry Pi and connect the power supply. The Raspberry Pi should boot up and display the NOOBS interface.
- Select the operating system you wish to install from the list of options. The Raspberry Pi OS (previously known as Raspbian) is the official operating system and is recommended for most users. You can also choose other operating systems like Ubuntu or Windows 10 IoT
- Click “Install” to begin the installation process. This will take several minutes to complete, depending on the speed of your microSD card and the size of the operating system.
- Once the installation is complete, the Raspberry Pi will reboot and load the new operating system. You will then be prompted to configure your system settings, such as keyboard layout and network settings.
Alternatively, you can also use other methods like using Raspberry Pi Imager that is available for Windows, Mac and Ubuntu to write the image to the SD card. This can be a simpler way to install the operating system if you are not comfortable with the command line.
It’s important to note that you should always use the latest version of NOOBS and the Raspberry Pi OS to ensure compatibility and security. Also, make sure you have a backup of your important data before formatting the SD card as it will erase all the data on it.
Configuring the System:
Once you have installed the operating system on your Raspberry Pi, you will need to configure the system settings to suit your needs. Here are some basic steps you should follow:
- Connect to a network: Depending on the operating system you are using, you may need to configure your network settings. This can be done through the “Preferences” or “Settings” menu. You can connect to a Wi-Fi network or use an Ethernet cable to connect to a wired network.
- Set the correct time and date: The Raspberry Pi uses the Network Time Protocol (NTP) to automatically set the time and date. However, you can also manually set the time and date if necessary. This can be done through the “Preferences” or “Settings” menu.
- Configure the keyboard: If you are using a keyboard with a different layout, you may need to configure the keyboard settings. This can be done through the “Preferences” or “Settings” menu.
- Update the system: It’s important to keep your Raspberry Pi up to date to ensure it has the latest security patches and software updates. You can update the system through the “Preferences” or “Settings” menu, or by using the terminal command “sudo apt-get update” and “sudo apt-get upgrade”
- Enable SSH : SSH stands for Secure Shell, it is a protocol which helps you to remotely access the terminal of your raspberry pi. You can enable SSH in the Raspberry Pi settings menu, or by using the terminal command “sudo raspi-config” and then selecting Interfacing Options > SSH
- Enable Remote Desktop : If you want to remotely access the desktop of the raspberry pi, you can enable the remote desktop in the Raspberry Pi settings menu, or by using the terminal command “sudo raspi-config” and then selecting Interfacing Options > VNC > Yes
These are just a few basic steps you can take to configure your Raspberry Pi system. You can also adjust other settings such as the display resolution or audio output as per your requirement. Once you have completed these steps, your Raspberry Pi should be fully configured and ready to use for your projects or general purpose.
Connecting to the Internet:
Connecting your Raspberry Pi to the internet is an important step to be able to use it for various tasks and projects. The Raspberry Pi can connect to the internet in two ways: through a wired connection or a wireless connection.
- Wired connection: To connect your Raspberry Pi to the internet using a wired connection, you will need an Ethernet cable. Simply plug one end of the cable into your Raspberry Pi and the other end into your router or modem. The Raspberry Pi should automatically detect the connection and connect to the internet.
- Wireless connection: To connect your Raspberry Pi to the internet using a wireless connection, you will need a wireless adapter (also known as a WiFi dongle). Plug the adapter into your Raspberry Pi’s USB port and then configure the wireless settings through the terminal or the desktop interface.
You can also use the built-in WiFi module in the latest version of Raspberry Pi 4 and Raspberry Pi 3b+
- Connecting to a specific network: To connect your Raspberry Pi to a specific network, you will need to know the network name (also known as the SSID) and the password. Once you have this information, you can use the terminal command “sudo nano /etc/wpa_supplicant/wpa_supplicant.conf” to edit the wireless settings and enter the network name and password.
- Check internet connectivity: Once you have connected your Raspberry Pi to the internet, you can check the connection by using the terminal command “ping google.com”. This will send a ping request to the google server and you should see a response if the connection is successful.
It is important to note that some wireless networks may require additional configuration or authentication. In such cases, you may need to consult the network administrator or refer to the documentation provided by your internet service provider.
Once you are connected to the internet, you can use your Raspberry Pi for various projects and tasks, such as running a web server, controlling IoT devices, or even streaming media.
Basic Linux commands:
The Raspberry Pi runs on a Linux operating system, and as such, it is important to know some basic Linux commands in order to navigate and interact with the system. Here are a few common Linux commands that you can use on your Raspberry Pi:
- pwd (Print Working Directory): This command shows you the current directory you are in.
- cd (Change Directory): Use this command to navigate to a different directory. For example, “cd Documents” will take you to the Documents directory.
- ls (List): Use this command to view the contents of a directory. You can use “ls -al” to show hidden files and directories.
- mkdir (Make Directory): Use this command to create a new directory. For example, “mkdir newfolder” will create a new folder named “newfolder”
- cp (Copy): Use this command to copy a file or directory. For example, “cp file.txt /home/user/Documents” will copy “file.txt” to the Documents directory.
- mv (Move): Use this command to move a file or directory. For example, “mv file.txt /home/user/Documents” will move “file.txt” to the Documents directory.
- rm (Remove): Use this command to delete a file or directory. For example, “rm file.txt” will delete the file “file.txt”. Be careful when using this command, as deleted files cannot be recovered.
- apt-get: Use this command to install or update software packages. For example, “sudo apt-get install python3” will install python3 package.
- nano: Use this command to open a terminal-based text editor. For example, “nano file.txt” will open the file “file.txt” in the nano editor.
- reboot / shutdown : Use these command to reboot or shutdown your raspberry pi. “sudo reboot” will reboot the raspberry pi, “sudo shutdown -h now” will shut down the raspberry pi
These are just a few basic Linux commands that you can use on your Raspberry Pi. There are many other commands and options available, and it is a good idea to familiarize yourself with them in order to make the most of your Raspberry Pi.
Getting started with Programming:
The Raspberry Pi is a powerful tool for programming and can be used for a wide range of projects, from simple scripts to complex applications. Here are a few steps to get started with programming on your Raspberry Pi:
- Choose a programming language: The Raspberry Pi supports many programming languages, such as Python, C, C++, Java, and more. Python is a popular choice for beginners due to its simplicity and wide range of libraries and modules.
- Install the necessary software: Depending on the programming language you choose, you may need to install additional software or libraries. For example, if you are using Python, you can install the IDLE (Integrated Development Environment) by running the command “sudo apt-get install idle3” in the terminal.
- Write your code: You can write your code using a text editor or an integrated development environment (IDE). IDLE is a simple IDE that comes pre-installed with Python.
- Run your code: Once your code is written, you can run it by using the terminal or by using the run button in your IDE.
- Debugging: It is likely that you will encounter errors in your code. To debug your code, you can use the print() function to check the values of variables, or you can use the built-in debugging tools in your IDE.
- Learn from examples: There are many resources available online for learning how to program with the Raspberry Pi, including tutorials, sample code, and forums.
- Experiment with different libraries and modules: The Raspberry Pi has a wide range of libraries and modules available for various tasks, such as controlling GPIO pins, working with sensors, and creating graphical user interfaces.
- Join the community: The Raspberry Pi community is a great place to learn and share knowledge. Joining a group or a forum can be a great way to learn new things, get help with problems, and stay up-to-date with the latest developments.
By following these steps, you can get started with programming on your Raspberry Pi and start creating your own projects. Remember to be patient and persistent, as learning to program takes time and practice.
Exploring the Raspberry Pi community:
The Raspberry Pi community is a vibrant and active group of enthusiasts who share a passion for the device and its potential. Here are a few ways to explore and engage with the community:
- Join a forum: There are many online forums dedicated to the Raspberry Pi, such as the official Raspberry Pi forum (https://www.raspberrypi.org/forums/) where you can ask questions, share your projects, and learn from others.
- Attend a meetup: Many local communities organize regular meetups for Raspberry Pi enthusiasts to share ideas and collaborate on projects. You can find a list of upcoming meetups on the official Raspberry Pi website (https://www.raspberrypi.org/events/)
- Participate in online challenges: The Raspberry Pi Foundation regularly runs online challenges and competitions to encourage innovation and learning. These challenges often have prizes and offer a great opportunity to learn new skills and showcase your projects.
- Join social media groups: There are many social media groups dedicated to the Raspberry Pi, where you can share your projects, ask questions, and engage with other members of the community.
- Read blogs and tutorials: Many members of the Raspberry Pi community share their knowledge and experiences through blogs and tutorials. These resources can be a great way to learn new skills and stay up-to-date with the latest developments in the community.
- Contribute to open-source projects: The Raspberry Pi community is built on open-source software, and many projects are available on GitHub. You can contribute to these projects by submitting pull requests, writing documentation, or reporting bugs.
By engaging with the Raspberry Pi community, you can learn new skills, share your knowledge, and be a part of a vibrant and supportive community of like-minded individuals.
Cool projects and Ideas:
The Raspberry Pi is a versatile device that can be used for a wide range of projects, from simple scripts to complex applications. Here are a few cool project ideas to get you started:
- Media center: The Raspberry Pi can be used to build a low-cost, low-power media center for streaming movies, music, and TV shows. You can install software such as Kodi or Plex on your Raspberry Pi to create a custom media center.
- Retro gaming console: The Raspberry Pi can be used to emulate classic gaming consoles, such as the Nintendo Entertainment System and the Sega Genesis. You can install software such as RetroPie to turn your Raspberry Pi into a retro gaming console.
- Smart home automation: The Raspberry Pi can be used to control and automate various devices in your home, such as lights, thermostats, and cameras. You can use software such as Home Assistant or Node-RED to create custom automations.
- Time-lapse camera: The Raspberry Pi can be used to create a time-lapse camera by connecting a camera module and programming it to take pictures at specific intervals. The pictures can be stitched together to create a time-lapse video.
- Weather station: The Raspberry Pi can be used to create a weather station by connecting various sensors to measure temperature, humidity, pressure, and more. You can use software such as Weather Station to display the data in a web interface.
- Robotics: The Raspberry Pi can be used to control a robot by connecting motors, sensors, and other hardware. You can use programming languages such as Python to control the robot’s movements and behavior.
- 3D printer: The Raspberry Pi can be used to control a 3D printer by running software such as Octo-Print. You can use the Raspberry Pi to control the printer, monitor the print progress and even use the camera module to take a time-lapse of the print process.
- AI/ML: The Raspberry Pi can be used for machine learning and AI applications, such as image and speech recognition, by using libraries such as TensorFlow and OpenCV. You can use the Raspberry Pi to train models and run inferences on the device itself or in cloud.
These are just a few examples of the many projects that can be built with a Raspberry Pi. With its small size, low power consumption, and powerful hardware, the possibilities are endless. Remember to be creative and always keep learning new things.
Troubleshooting and Maintenance:
Troubleshooting and maintenance are important aspects of working with a Raspberry Pi. Here are a few tips for troubleshooting and maintaining your device:
- Check your connections: Make sure all of your connections are secure and properly connected. A loose or disconnected cable can cause issues with power, connectivity, or hardware.
- Check your power supply: Make sure you are using a power supply that meets the recommended specifications for your Raspberry Pi. A power supply that is too weak can cause issues with stability or performance.
- Check your SD card: Make sure your SD card is properly formatted and that the operating system is correctly installed. A corrupt or incorrectly installed SD card can cause issues with booting or stability.
- Check your software: Make sure you have the latest version of the operating system and software installed. Outdated software can cause compatibility issues or security vulnerabilities.
- Check the logs: The Raspberry Pi logs many system events, including messages about system initialization, system errors, and software problems. Use the command line tool called dmesg or journalctl to view the logs and troubleshoot any issues.
- Back up your data: Regularly back up your data to an external device or cloud service to protect against data loss due to hardware failure or other issues.
- Keep the device clean: Keep the device and its peripherals clean, free of dust, and away from moisture.
- Keep the device updated: Regularly check for software updates and apply them to keep the device secure and up-to-date.
- Get help from the community: The Raspberry Pi community is a helpful and supportive group of enthusiasts. If you are having trouble with your device, don’t hesitate to reach out to the community for help.
By following these tips, you can help ensure that your Raspberry Pi is running smoothly and that your projects are successful. Remember that the troubleshooting process can be a learning experience and an opportunity to improve your understanding of the device and the software that runs on it.