The Attiny85 is a microcontroller chip manufactured by Atmel, which is now owned by Microchip Technology. It is a member of the Atmel AVR family of microcontrollers and is based on the AVR RISC architecture.
One of the unique features of the Attiny85 is its small form factor, which makes it ideal for use in projects where space is limited. It is commonly used in DIY electronics projects, such as robotics, home automation, and wearable technology.
Overview of the Attiny85
The Attiny85 is particularly well-suited for applications where space is limited, thanks to its small form factor and low power consumption. It has 8 kilobytes of flash memory for program storage, 512 bytes of SRAM for data storage, and 512 bytes of EEPROM for non-volatile data storage. It also has 6 general-purpose I/O pins, which can be configured for a variety of functions, including digital input/output, PWM output, and ADC input.
| Parameter | Description |
|---|---|
| Architecture | AVR RISC |
| Instruction set | Reduced Instruction Set Computing (RISC) |
| Flash memory | 8 kilobytes (of which 2 KB is used for bootloader) |
| SRAM | 512 bytes |
| EEPROM | 512 bytes |
| CPU speed | Up to 20 MHz (at 5V) |
| I/O pins | 6 |
| PWM channels | 3 |
| Analog inputs | 4 |
| Operating voltage | 1.8V – 5.5V |
| Power consumption | 300 µA at 1 MHz and 1.8V, 4 mA at 20 MHz and 5V |
| Communication | SPI, I2C, and USI (Universal Serial Interface) protocols |
| Programming | In-system programming (ISP) via SPI interface |
| Package | 8-pin DIP, SOIC, QFN, and VQFN |
The Attiny85 can be programmed using a variety of programming languages, including C and Arduino. There are also several development boards and programmers available that can be used to program the Attiny85. Its versatility and small size make it an ideal choice for a wide range of projects, from robotics and automation to wearable technology and IoT applications.
Attiny 85 Microcontroller Pinout
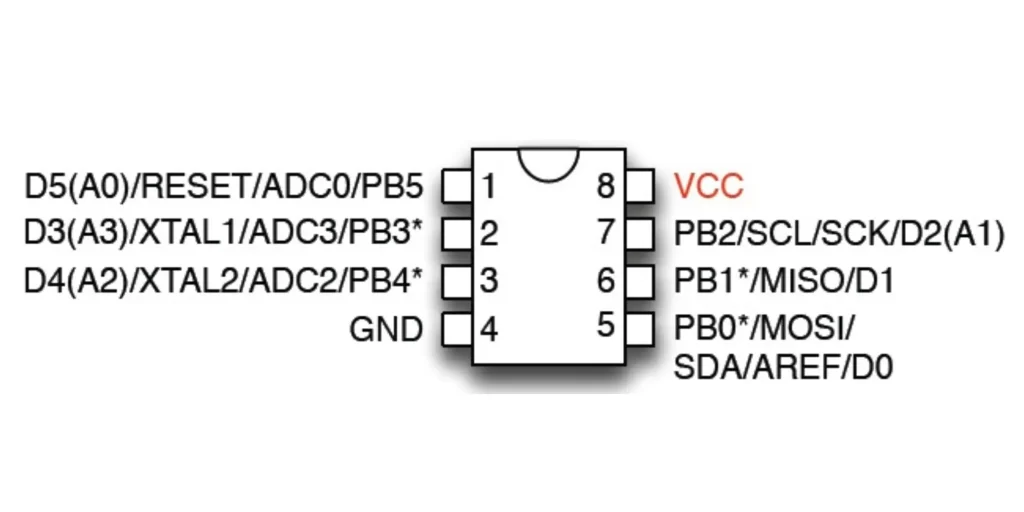
ATtiny85 IC Pinout
| Pin Number | Pin Name | I/O Type | Description |
|---|---|---|---|
| 1 | PB5 (OC1A) | Output | PWM output channel A |
| 2 | PB3 (OC2A) | Output | PWM output channel B |
| 3 | PB4 | Input | General-purpose digital I/O pin |
| 4 | GND | – | Ground |
| 5 | PB0 (MOSI) | Input/Output | SPI master-out, slave-in or general-purpose digital I/O pin |
| 6 | PB1 (MISO) | Input/Output | SPI master-in, slave-out or general-purpose digital I/O pin |
| 7 | PB2 (SCK) | Input/Output | SPI clock or general-purpose digital I/O pin |
| 8 | VCC | – | Positive supply voltage |
Programming ATtiny85 Using Arduino
Programming the Attiny85 using Arduino requires a few additional steps compared to programming an Arduino board directly, but it is relatively straightforward. Here are the general steps to follow:
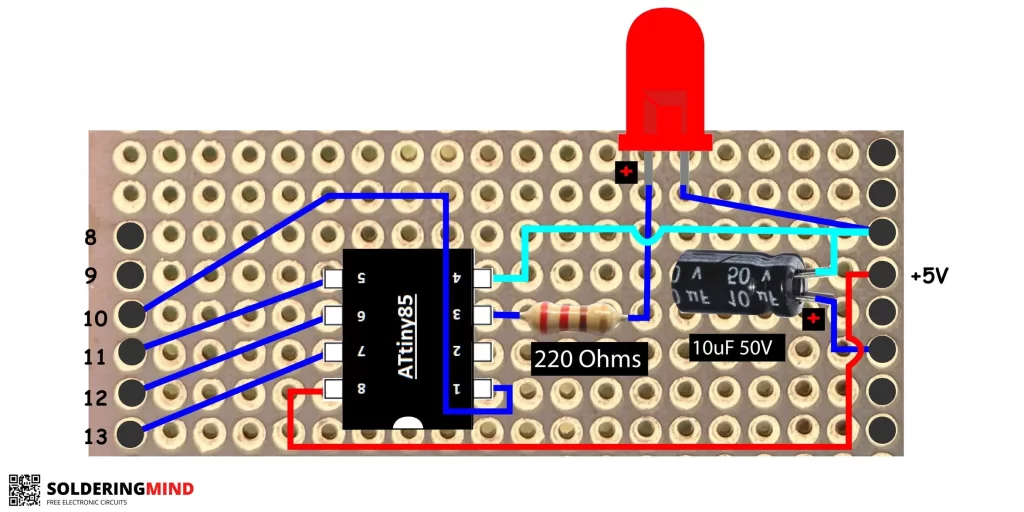
- Connect the Attiny85 to an Arduino board: You can connect the Attiny85 to an Arduino board using a breadboard or a shield. Make sure to connect the following pins of the Attiny85 to the corresponding pins of the Arduino board:
- Attiny85 pin 1 to Arduino pin 10
- Attiny85 pin 5 to Arduino pin 11
- Attiny85 pin 6 to Arduino pin 12
- Attiny85 pin 7 to Arduino pin 13
- Attiny85 pin 8 (VCC) to Arduino 5V
- Attiny85 pin 4 to Gnd
- Install the Attiny support package: Open the Arduino IDE and go to Tools > Board > Boards Manager. Search for “attiny” and install the Attiny support package by David A. Mellis.
- Configure the Arduino IDE: Go to Tools > Board and select “Attiny85”. Then go to Tools > Programmer and select “Arduino as ISP”.
- Burn the bootloader: Go to Tools > Burn Bootloader to burn the Arduino as ISP firmware to the Arduino board. This step is required to use the Arduino board as a programmer for the Attiny85.
- Write and upload the code: Write your code in the Arduino IDE and upload it to the Attiny85 using the “Upload using Programmer” option in the Sketch menu. This will compile the code and upload it to the Attiny85 via the Arduino board acting as a programmer.
That’s it! Your code should now be running on the Attiny85 microcontroller. Note that the pins used for programming the Attiny85 via the Arduino board may vary depending on the Arduino board model, so make sure to check the pinout diagram of your specific board.
Conclusion
In conclusion, the Attiny 85 microcontroller is a versatile and low-cost solution for embedded systems that require a small footprint and low power consumption. Its technical specifications include 8 KB of flash memory, 512 bytes of SRAM, and 512 bytes of EEPROM, making it suitable for a wide range of applications.
Programming the Attiny85 using an Arduino board is a popular method that requires a few additional steps, such as installing the Attiny support package, configuring the Arduino IDE, burning the bootloader, and uploading the code using a programmer. However, once set up, programming the Attiny85 via an Arduino board is a straightforward process.
Overall, the Attiny85 is a great choice for hobbyists, students, and professionals who need a compact and low-power microcontroller that can be programmed using a familiar development environment.